Remix for Next.js Developers
- Authors

- @yaaang
- Last updated
I previously introduced Remix by highlighting a few of the key design decisions that makes it different from many other frameworks.
I come from a background of having worked primarily with Next.js, so I thought I’d put together a to-the-point guide for folks who are experienced with Next.js to be able to quickly orient themselves within Remix.
This post delves into a bit more detail, and I’ll try to keep this post updated over time. DM me with any suggestions and corrections!
Contents:
- Client-server form handling architecture
- Always SSR
- Control over hydration
- Styling
- File-based routing with nested routes
- Data fetching colocated with (nested) routes
- Deployment
- Miscellanea
- Alignment with React roadmap
- Plasmic + Remix = 🌈
Client-server form handling architecture
We’ll start with what is arguably the most pronounced departure from how Next.js apps are structured. I find this easiest to illustrate by example.
How would you implement a basic contact form page in Next.js? It typically looks something like this, where you are often relying on heavy client-side JavaScript to orchestrate the client-server communication:
// pages/contact.tsx

// Typical Next.js app submitting form data REST API endpoints.
export default function ContactPage() {
  // Or use some form state management library.
  const [name, setName] = useState(null)
  const [email, setEmail] = useState(null)
  // For submission-related form state.
  const [submitting, setSubmitting] = useState(false)
  const [errors, setErrors] = useState(null)
  // The actual form.
  return (
    <form onSubmit={handleSubmit}>
      <input type="text" name="name" />
      {errors?.name && <em>Name is required</em>}
      <input type="text" name="email" />
      {errors?.email && <em>Email is required</em>}
      <button type="submit">Contact me</button>
    </form>
  )
  async function handleSubmit(e) {
    // Don't actually use the browser to submit the form and navigate away from the page.
    e.preventDefault()
    // Prepare the form data for submission.
    const formData = { name, email }
    // Perform client-side error validation.
    const errors = validateForm()
    if (errors) {
      setErrors(errors)
    } else {
      setSubmitting(true)
      try {
        // Communicate with the server.
        const response = await fetch('/api/contact', {
          method: 'POST',
          body: JSON.stringify({
            contact: {
              ...formData,
            },
          }),
        })
        const result = response.json()
        if (result.errors) {
          setErrors(result.errors)
        } else {
          // Reset the form state...
          setName(null)
          setEmail(null)
          // ...or navigate back to the homepage.
          router.push('/')
        }
      } finally {
        setSubmitting(false)
      }
    }
  }
}
And then there’s the server-side request API route, which lives off in pages/api/contact.ts:
export default function handler(req, res) {
  const { name, email } = req.body

  let errors = {}
  if (!name) errors.name = true
  if (!email) errors.email = true

  if (Object.keys(errors).length > 0) {
    res.status(400).json(errors)
  } else {
    await createContactRequest({ name, email })

    res.status(200).json({ success: true })
  }
}
This approach is typical of single-page apps, and requires a good deal of (pretty boilerplate) JavaScript to get to basic functionality. (And it certainly won’t work at all without JavaScript—or more generally, without having hydrated the full page bundle.) Manually implementing your own fetch-based form handling also is susceptible to issues such as async fetch issues.
Contrast this with Remix’s approach, which harkens back to the days of server templated web apps in PHP/Rails that had much less JavaScript. It leverages the browser’s innate ability to already perform this client-server form submission natively:
// app/routes/contact.tsx

export let action: ActionFunction = async ({ request }) => {
  let formData = await request.formData()

  let name = formData.get('name')
  let email = formData.get('email')

  let errors = {}
  if (!name) errors.name = true
  if (!email) errors.email = true

  if (Object.keys(errors).length > 0) {
    return errors
  }

  await createContactRequest({ name, email })

  return redirect('/contact')
}

export default function ContactPage() {
  // We can get the server's error context as structured JSON data. This will
  // only be defined when this page was loaded as the response of a form
  // submission.
  //
  // This is all the code you need!
  let errors = useActionData()
  return (
    <form method="post">
      <input type="text" name="name" />
      {errors?.name && <em>Name is required</em>}
      <input type="text" name="email" />
      {errors?.email && <em>Email is required</em>}
      <button type="submit">Contact me</button>
    </form>
  )
}
It’s ostensibly just an HTML form with a PHP-style server-side POST handler. And this will just work—even without any Javascript hydrated.
useActionData makes available any JSON data that was returned from the action handler.
This action architecture is what defines Remix as a full-stack framework.
We can get away with much less userland client-side code because Remix’s design is modeled after the traditional browser-supported client-server model. And the server-side code is logic that you would need regardless, since form validation must always be performed authoritatively on the server.
Developers who aren’t familiar with this should be aware that the typical pattern for these handlers is:
- On validation failure, return the error details and re-render the same page.
- On success, redirect to a destination page. Sometimes, you want to display a success “toast” message on destination page—you can stuff this into the session (Remix has built-in sessions).
What if you have multiple forms on the same page?
You can disambiguate which form to handle by introducing hidden fields or (as I learned from @kentcdodds!) attaching a value on the submit button.
What if you want generic REST APIs?
Note that action handlers in this style are (intentionally) tightly coupled to the specific view—whereas in the Next.js example, the API endpoint was part of a generic REST API that could serve arbitrary pages and clients.
You can still define general-purpose API endpoints as “resource routes”,
which are simply routes that return arbitrary data by defining just a loader function (described later).
Unlike in Next.js, these don’t necessarily live under /api.
What if you want client-side interactivity/validation and optimistic UI?
Swap out the form with Form and use Remix’s useTransition hook—not to be confused with Concurrent React’s useTransition!
// app/routes/contact.tsx

export let action: ActionFunction = async ({ request }) => {
  /*...*/
}

export default function ContactPage() {
  // We can get the server's error context as structured JSON data, so as to re-render the form without reloading the page.
  let errors = useActionData()
  // Show the optimistic UI once submission starts.
  let { submission } = useTransition()
  return submission ? (
    <Confirmation contact={Object.fromEntries(submission.formData)} />
  ) : (
    <Form method="post">...</Form>
  )
}
The server still performs the authoritative validation (as it must), but now users enjoy snappy client-side feedback. If you want client-side validation, you can further extract out that validation logic from the action and run it on the client.
The subtle thing that’s happening here is that the client is able to communicate with the server both using fetch with JSON data or retrieving a full HTML response (if Javascript is not yet available).
Always SSR
Remix is always server-side-rendered, and doesn’t support the notion of certain pages being marked as statically generated. However, this doesn’t mean it can’t achieve static site performance.
At a basic level, if your server-side data fetching and rendering is fast enough, you can achieve static site performance by deploying to edge servers, which you can think of as “compute with the distribution of CDNs.” Much of the industry is rapidly moving in this direction, for good reason.
However, this is not always possible, or perhaps your page assembly is inherently dependent on slow backend services. In this case, you can take advantage of HTTP caching. By putting a CDN in front of your serving infrastructure, and returning the right Cache-Control headers, you can let the CDN save and serve your unchanging content with minimal latency.
A significant benefit to this is that rather than performing full static site builds, you are able to immediately redeploy changes.
// app/routes/some-page.tsx

export function headers() {
  return {
    'Cache-Control': 'public, max-age=300, s-maxage=3600, stale-while-revalidate=300',
  }
}

export default function SomePage() {
  return <div>...</div>
}
This lazy pull vs. eager push is a tradeoff—you sacrifice more direct framework-level control of invalidation, and instead will need to reach for more CDN-specific cache flushing machinery. You also don’t get an actual directory of static files produced that you can just toss on S3 or GitHub Pages (nor do you get a sitemap.xml for free). Invalidation in the user’s browser is another added consideration, so you probably don’t want to be overly aggressive on the cache expiry.
Control over hydration
A long-standing wishlist item for Next.js is partial hydration—especially for mostly-static content, modern React SSR/SSG frameworks ship and rehydrate far more than the necessary Javascript bundles, which can have a significant impact on page load performance.
Remix does let you decide when you want hydration, but it’s currently on a per-whole-page basis.
The way you do this is by (conditionally) not rendering the <Scripts/> element in the Document.
Straight from the docs page on this, you can check the routes that constitute the page for whether they’re marked as needing hydration, and conditionally render the <Scripts/> element based on that:
// app/entry.server.tsx

import React from 'react'
import { Meta, Links, Scripts, Outlet, useMatches } from 'remix'

export default function App() {
  let matches = useMatches()

  // If at least one route wants to hydrate, this will return true
  let includeScripts = matches.some((match) => match.handle?.hydrate)

  // then use the flag to render scripts or not
  return (
    <html lang="en">
      <head>
        <meta charSet="utf-8" />
        <Meta />
        <Links />
      </head>
      <body>
        <Outlet />
        {/* include the scripts, or not! */}
        {includeScripts && <Scripts />}
      </body>
    </html>
  )
}
Then open up each route module you want to include JavaScript for, and add that marker handle:
// app/routes/some-page.tsx

export let handle = { hydrate: true }

export default function SomePage() {
  return <div>...</div>
}
@ryanflorence from the Remix team tells me that they’re actively doing heavy research into partial hydration—so keep an eye on this space.
Styling
To add styling, you inject header links—very similar to how you would include stylesheets in plain HTML. This has the advantage of giving the developer full control with minimal magic. By giving Remix this information up-front, it can load all CSS in parallel with cacheable stylesheet URLs, which gives you optimal page load performance, especially when combined with prefetching.
(And as an example of the cost of such magic, to date, there is an (incredibly annoying) long-standing bug in Next.js bundling with incorrect CSS import ordering.)
In Remix, you specify the links like so, right in the associated route module:
// app/routes/some-page.tsx

import styles from '~/styles/global.css'
// styles is now something like /build/global-AE33KB2.css

export function links() {
  return [
    {
      rel: 'stylesheet',
      href: 'https://unpkg.com/modern-css-reset@1.4.0/dist/reset.min.css',
    },
    {
      rel: 'stylesheet',
      href: styles,
    },
  ]
}

export default function SomePage() {
  return <div>...</div>
}
However, exposing the styles via links (whether as CSS files) is also a requirement—which means it can be harder to get Remix to work with your preferred styling solution or component libraries. The docs provide various ways to bridge these gaps, but this is an important place to do a bit of research if you’re considering Remix for your stack.
File-based routing with nested routes
Remix adopts file-based routing, familiar to anyone using Next.js. But unlike Next.js, routes support React Router-style nesting, where you can compose routes together into a hierarchy.
For example, let’s say you’re building an app with these routes:
/dashboard/dashboard/settings/dashboard/reports
Typically, this section of the site might all share common layout and scaffolding.
You can provide this by defining a top-level app/routes/dashboard.tsx file.
Pay particular attention to <Outlet/>—that’s the key abstraction here.
You can squint and think of it roughly similar to children props.
// app/routes/dashboard.tsx

export default function DashboardLayout() {
  // There is some shared layout for anything under /dashboard.
  return (
    <div>
      <Header />
      {/* This is a placeholder for the content rendered by whichever nested route we're going to. */}
      <Outlet />
      <Footer />
    </div>
  )
}
And then you can have nested routes /dashboard/settings, /dashboard/reports, and /dashboard itself:
// app/routes/dashboard/settings.tsx
export default function Settings() {
  // ...
}
// app/routes/dashboard/reports.tsx
export default function Reports() {
  // ...
}
// app/routes/dashboard/index.tsx
export default function DashboardMain() {
  // ...
}
This becomes particularly interesting in the context of data loading, described next.
Like Next.js, Remix supports isomorphic routing, so transitions are fast on the client when JS is hydrated.
Data fetching colocated with (nested) routes
In Next.js, you perform data-fetching at the top of the page,
in getStaticProps or getServerSideProps.
In Remix, you could start the same way as in Next.js, with a loader function that accompanies your page route.
It similarly serializes this data as JSON into the server-rendered page response.
The API is simple:
// app/routes/mypage.tsx

// This performs the data fetching.
export async function loader() {
  return fetch(/*...*/)
}

export default function MyPage() {
  const data = useLoaderData()
  return <div />
}
Howewever, a key difference in Remix is that loader functions are not just available at the page–level root, but at each (nested) route handler.
One benefit of this is colocation of data fetching with usage.
For instance, if you have a /dashboard/ root route, which renders a common page layout that displays the current user’s info, your accompanying loader could fetch the user’s info and render it in the layout.
You can do so with a loader function defined on the top-level app/routes/dashboard.tsx file:
export async function loader() {
  return getCurrentUser()
}

export default function DashboardLayout() {
  const currentUser = useLoaderData()
  return (
    <div>
      <Header>
        <UserAvatar user={currentUser} />
      </Header>
      {/* This is a placeholder for the content rendered by whichever nested route we're going to. */}
      <Outlet />
      <Footer />
    </div>
  )
}
And then a /dashboard/settings route might have a loader that fetches entirely different data.
The root view above doesn’t need to care about that, and the settings view similarly doesn’t need to care about currentUser.
You could perform this type of organization manually in Next.js by decomposing and scattering fragments of your getServerSideProps, but Remix provides first-class ergonomic support for this.
But now say every route under /dashboard/* will likely need to read the same currentUser information.
You can use React context to provide this to the entire tree, or you could use something like useParentData() from remix-utils:
// parent route
import { Outlet } from 'remix-utils'

export default function Parent() {
  return <Outlet data={{ something: 'here' }} />
}
// child route
import { useParentData } from 'remix-utils'

export default function Child() {
  const data = useParentData()
  return <div>{data.something}</div>
}
And in the next React Router/Remix release, this functionality will be built-in as <Outlet context/>.
A key performance characteristic of this decomposed data fetching design is that—similar to stylesheet links—because Remix knows up-front the data dependencies of the entire tree, it can execute all of these requests in parallel.
Deployment
Remix is well-supported in many environments, including not just Vercel, but Cloudflare Workers, Deno Deploy, Fly.io, and just any old Node host. Each deployment target may require slightly different sets of configurations and packages in your project, but it’s quite portable to both Node and non-Node environments (like Cloudflare).
While the Remix configurations for specific deployment targets are automatically scaffolded for you when using create-remix,
if you start with the default settings (Remix server) and then decide you want to deploy to Vercel or some other specific hosting provider, you’ll just need to do a bit of looking/diffing for the correct incantations.
Miscellanea
-
Remix has baked-in support for handling session and cookies, which is quite nice, and especially important for its client-server architecture.
-
Remix supports dynamic routes, which look like
app/routes/reports/$report.tsx—note that route parameters use$paraminstead of[param]:export default function Report() { // ... return <div>...</div> }They also support “splat” routes, so that
app/routes/reports/$.tsxcan match/reports/foo/bar. (The[angle brackets]are actually used instead to escape characters, so if you want a route to include literal$or dots, you can enclose them like withapp/routes/[dots.and.$dollars].tsx) -
Whereas Next.js has global
App/Documentwrappers, Remix’s equivalent wrapper is in entry.server.tsx. It also exposes an entry.client.tsx, which gives you more complete end-to-end control over exactly how the hydration happens. -
There are a few features I miss from Next.js:
- Optimized image component: this is the main one, the other two are pretty minor, but this one might be addressible in due time
- Automatic font CSS inlining for Google Fonts and Typekit
- Fine-grained control over script scheduling and prioritization
Alignment with React roadmap
One of the big open questions when Remix launched is whether and how Remix converges on some of the new things coming in React 18, especially the new developments in server-side Suspense and what it brings in terms of: streaming, data fetching, React server components, and more. This is a timely question as Next.js is quickly embracing React 18, and I believe that Remix’s approach of determining up-front data dependencies positions it well to fit React’s recommended “render-as-you-fetch” usage of Suspense.
On streaming, the Remix team is already moving toward the React 18 Suspense server architecture, so it will be able to take advantage of streaming.
On React server components, the current state of affairs as of Dec 2021 is that the Remix team has been doing their own research and engaging the React core team, starting with a set of evaluations of the currently available React server component demos.
There were a few blockers with making this into a meaningful evaluation, primarily the infelicities of these particular demos and the open questions within React server components as a whole.
I actually believe that it would be super interesting to take a closer look at Shopify Hydrogen, which in my view is the furthest-along among all the available implementations (including the React team’s own 2020 demo). The caveat is that Shopify’s implementation is forging ahead and filling in various gaps not yet explicitly addressed in React core, but the current state of their gap-filling appears tightly aligned with the original goals and spirit of React server components. (This is another set of blog posts I’ve been hoping to dive into.) Fortunately, I’m told the Remix team is already engaging the Shopify team as part of their ongoing research.
Plasmic + Remix = 🌈
Last but not least, Remix and Plasmic form a magical duo!
Once you install Plasmic, you can make pages and sections of pages in your Remix site visually editable to non-developers you work with in design and marketing teams—without writing a single line of CMS-specific schema or presentational code. This is possible because Plasmic is a free-form page builder that can render the design directly into your Remix app. You can go further and register arbitrary React components from your Remix app available for editors to drag and drop.
For instance, you can rapidly build landing pages with visual effects similar to Remix’s own epic landing page:
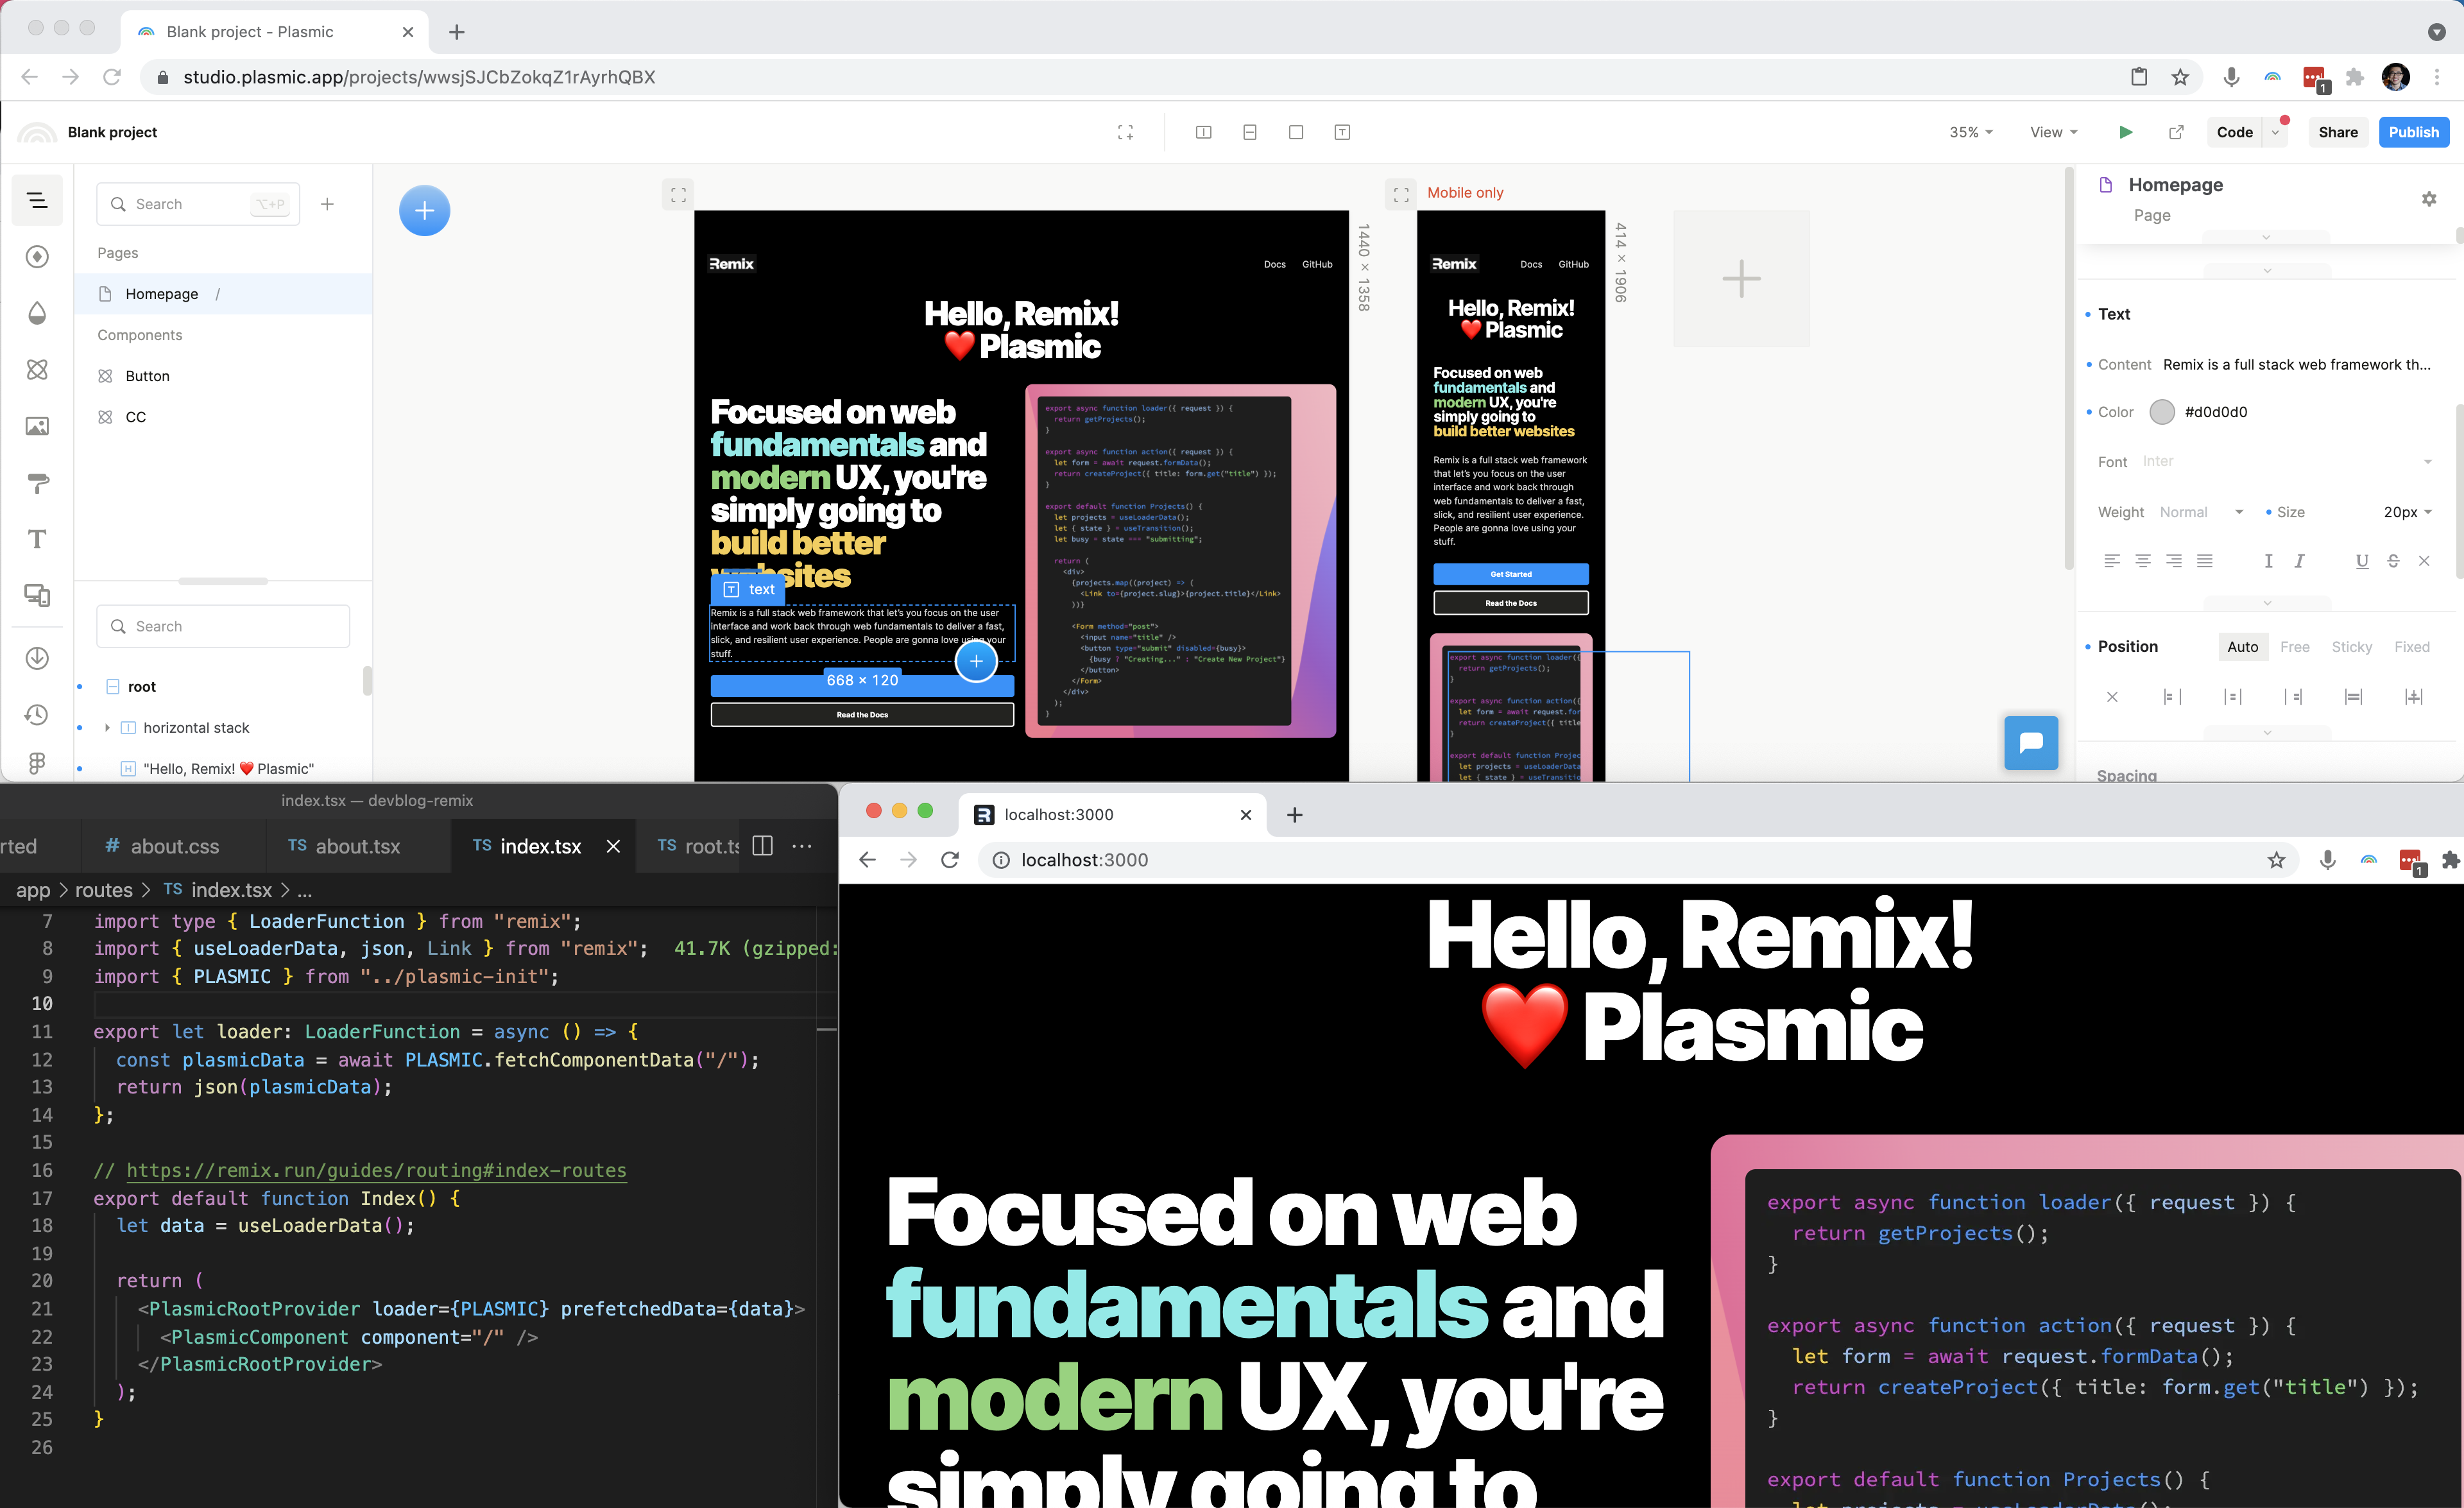
The integration with Remix SSR is buttery smooth—this is all you need to render any design straight into your Remix app:
export let loader = () => {
  // Load the design from Plasmic. This happens server-side.
  const plasmicData = await PLASMIC.fetchComponentData("/");
  return json(plasmicData);
}};

export default function Index() {
  // Render the Plasmic design.
  let plasmicData = useLoaderData();
  return (
    <PlasmicRootProvider loader={PLASMIC} prefetchedData={plasmicData}>
      <PlasmicComponent component="/" />
    </PlasmicRootProvider>
  );
}
As a super simple example, see the Plasmic/Remix “hello world” in this GitHub repo, the live Remix app, and the Plasmic design.
Check out the quickstart guide for Remix for more details, and reach out to me with any questions!
Thanks to @ryanflorence for feedback on this post! Discuss on Twitter
Follow @plasmicapp on Twitter for the latest updates.