Using Prisma with Plasmic
- Authors
- Link
- Alex Noel

- Last updated
Plasmic has no problem displaying data of any kind, and among the many available data sources Prisma is our favorite pick. It plays extremely well with large and structured data, and allows you to manage your data in a way that is both safe and efficient.
This guide walks through configuring the integration and using it to query Prisma/PostgreSQL data through Plasmic’s visual query builder. It also works as a reference for building a more custom integration on top.
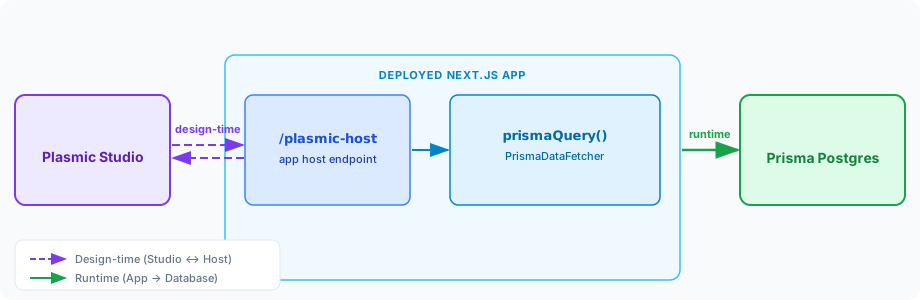
Configure Prisma
You can deploy the starter by clicking the Vercel button in the README.md or run the project locally first. If you are cloning the repo and running it yourself locally, install the dependencies first:
pnpm install
The build script runs prisma migrate deploy before next build, so we need to create the database and set up your environment:
- Create a Prisma Postgres instance with
pnpm dlx prisma init --db. - Create a local
.envfile. - Put the generated
DATABASE_URLinto that file. - Generate an
AUTH_SECRETwithpnpm dlx auth secretand add that too. - Run the initial migration with
pnpm dlx prisma migrate dev --name init. - Generate the Prisma Client with
pnpm dlx prisma generate. - Seed the database with
pnpm dlx prisma db seed.
Your local .env should end up looking roughly like this:
DATABASE_URL="postgres://USER:PASSWORD@HOST:5432/postgres?sslmode=require"
AUTH_SECRET="YOUR_RANDOM_SECRET"
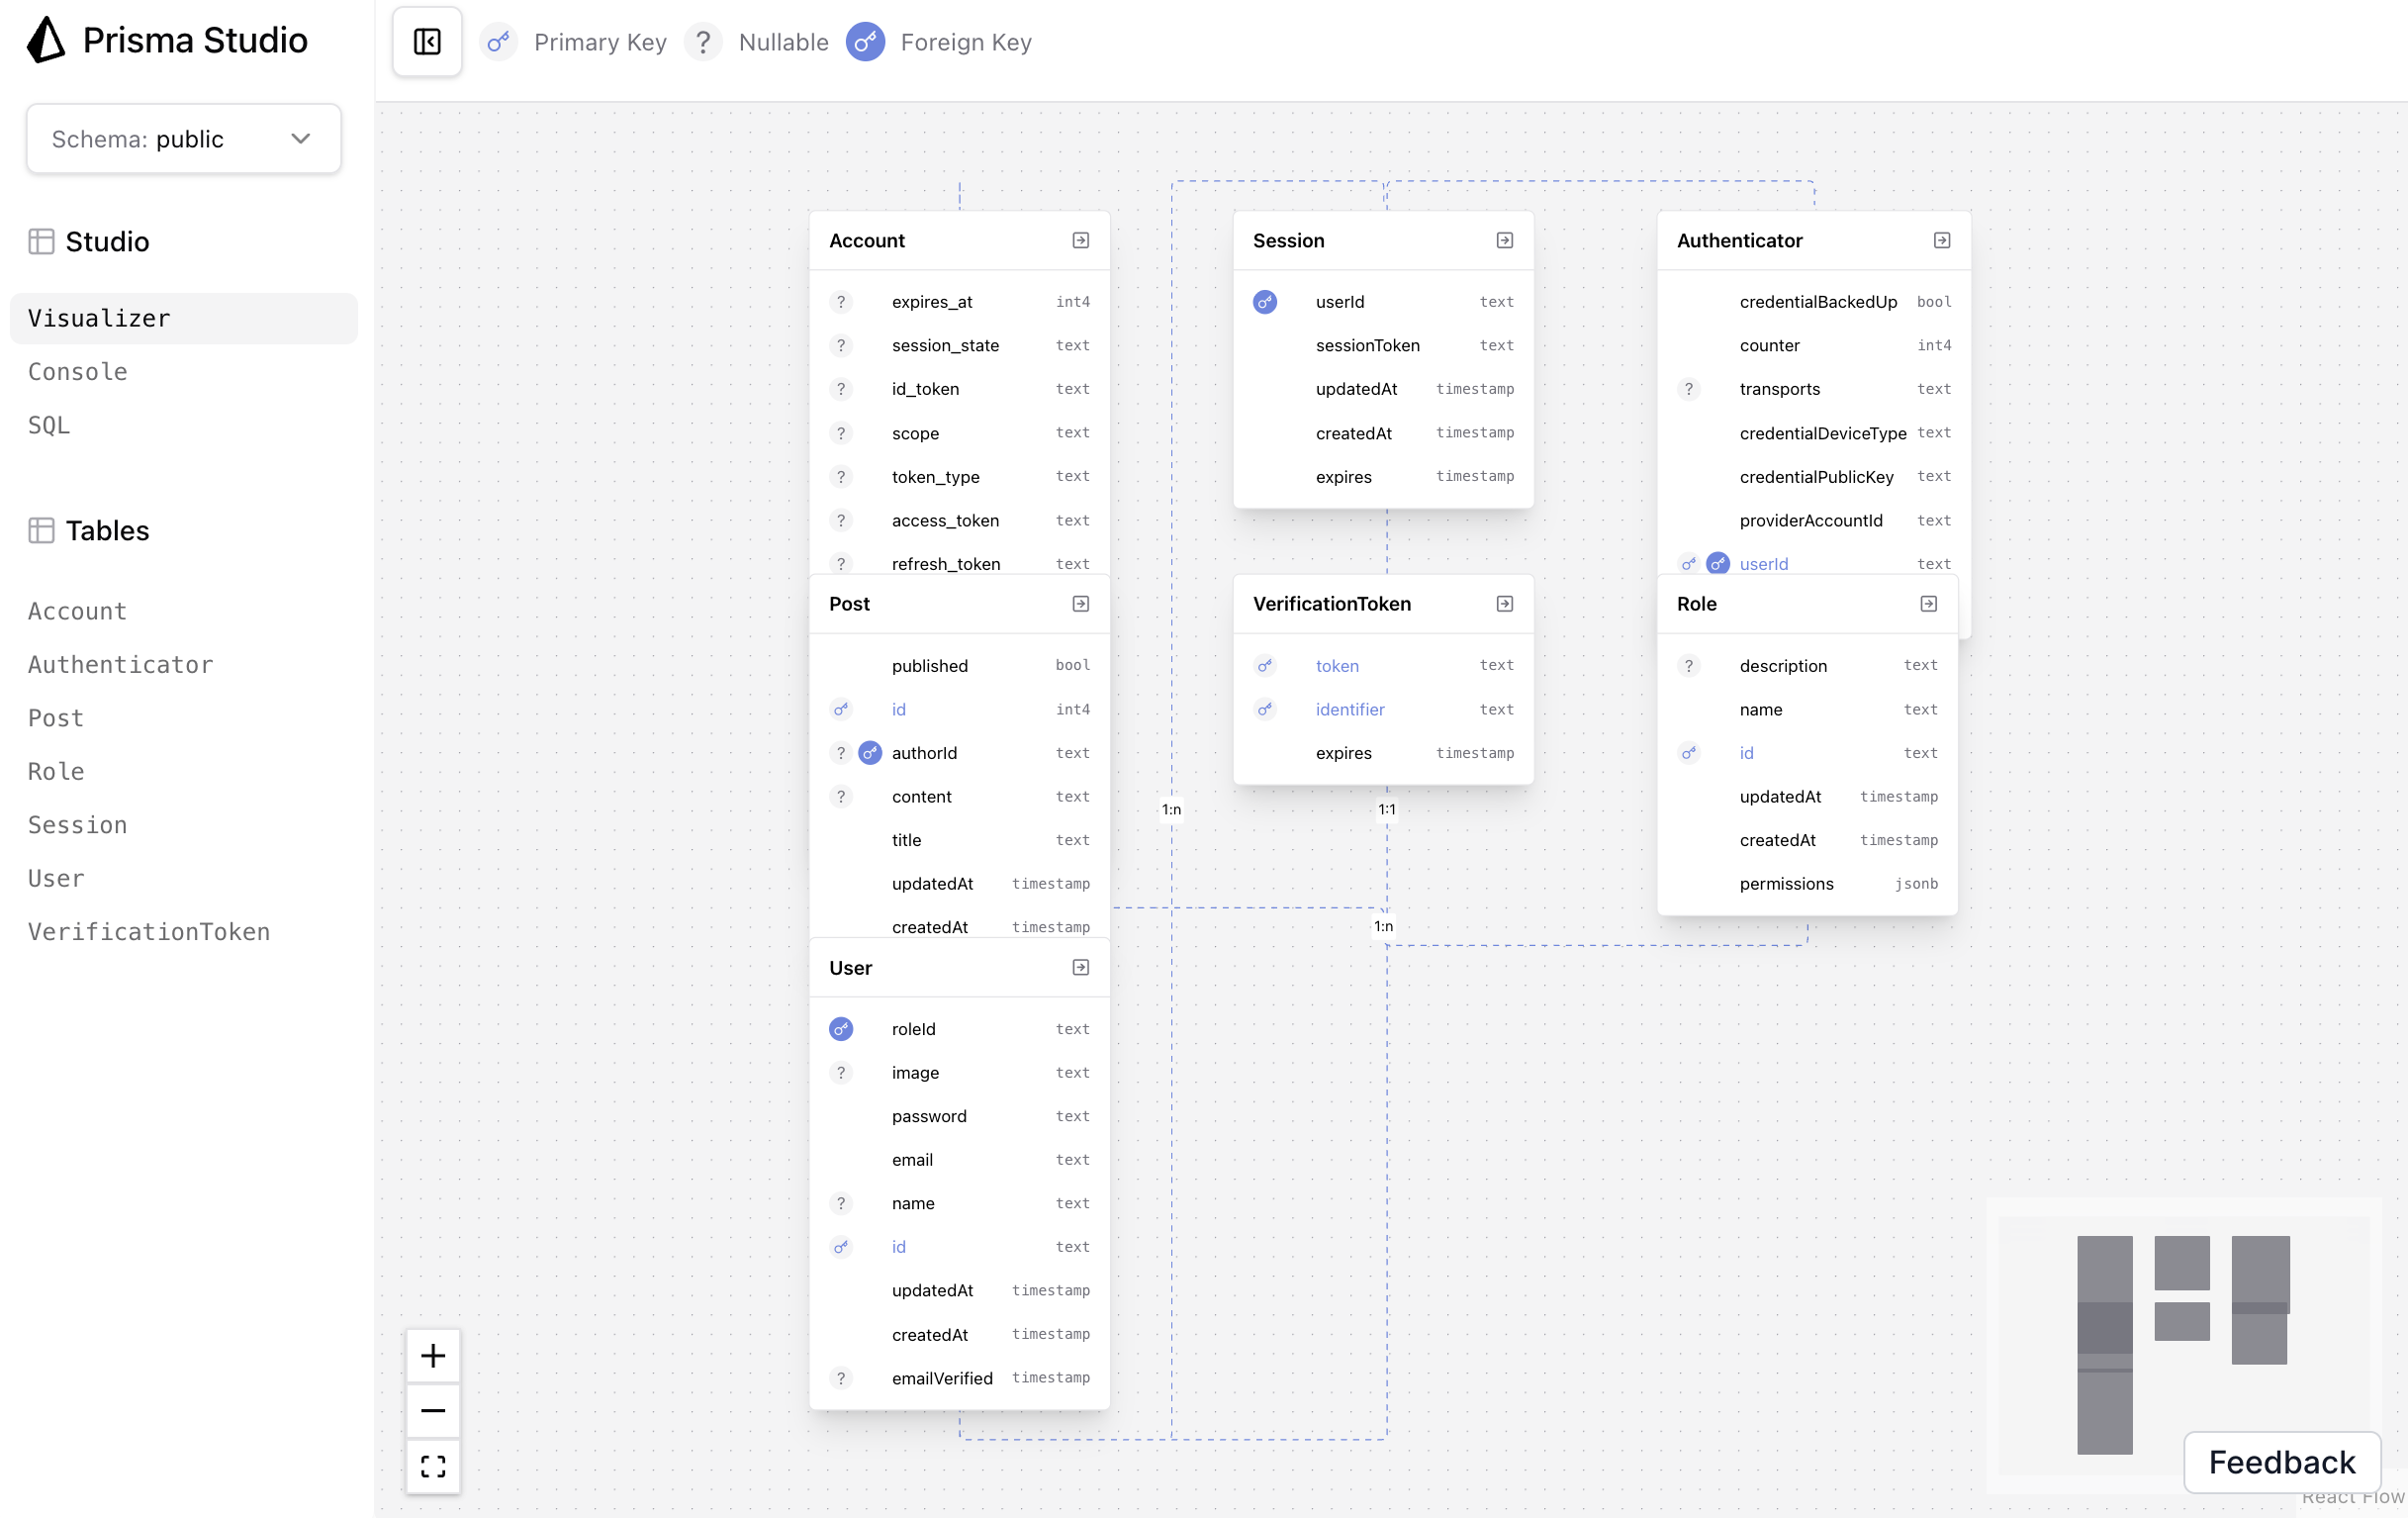
You can then run pnpm dlx prisma studio to confirm that the data is in place, or use Prisma Console in cloud. You should see the following tables:
Seeding the data
The Prisma schema in this repository already defines User, Role, and Post, together with the Auth.js tables for accounts and sessions. The seed script creates three roles:
guest, which can readreader, which can readwriter, which can read, create, update, and delete
It also creates sample users and posts. You can inspect a post list, open a post page, and verify that two users with different roles do not behave the same way.
In a fresh seed:
bob@example.com / password123is the writer accountalice@example.com / password123is the read-only account
Create a Plasmic project
If you do not already have a Plasmic project for this starter, create an empty one in Plasmic Studio first. The only things you need at this point are the project ID and public token.
Point the app at your Plasmic project
Edit plasmic-init.ts and replace the starter’s project ID and public token with your own:
- Project ID can be found in the project URL
- Public token can be found from the
Codebutton in the top-right corner of the project.
export const PLASMIC = initPlasmicLoader({
  projects: [
    {
      id: 'YOUR_PROJECT_ID',
      token: 'YOUR_PUBLIC_PROJECT_TOKEN',
    },
  ],
  preview: true,
})
Hint: The starter leaves preview: true on. That is convenient during development, but don’t forget to turn it off in production.
Run the app
Once the project ID and public token are in place, start the development server:
pnpm dev
Then open http://localhost:3000/plasmic-host. This will confirm if the app is running normally.
Configure your Plasmic app host
App host is a bridge between your codebase and Plasmic that passes your registered items into Studio:
- Data-fetching component -
PrismaDataFetcher - Auth context -
UserSession - Data query -
prismaQuery
Once the app is running, you need to set the app host in your Plasmic project. Localhost is fine while you are still changing registration metadata. Once other people need the project, use a deployed host URL instead.
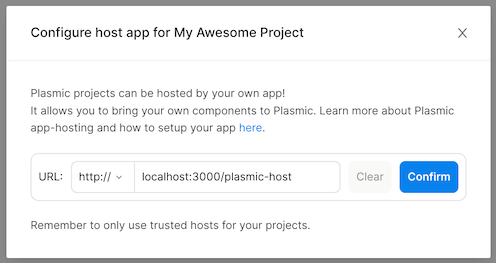
If the project reloads after you save the host URL, the connection is working.
Build a posts list page
Create or open a page in Plasmic that will serve as the blog index. Then add a page data query named Get Recent Posts with these settings:
- Function:
prismaQuery - Table:
Post - Operation:
findMany - Where:
publishedequalstrue - Include Relations:
author - Order By Field:
createdAt - Order Direction:
desc
Execute the query once in Studio and inspect the returned data.
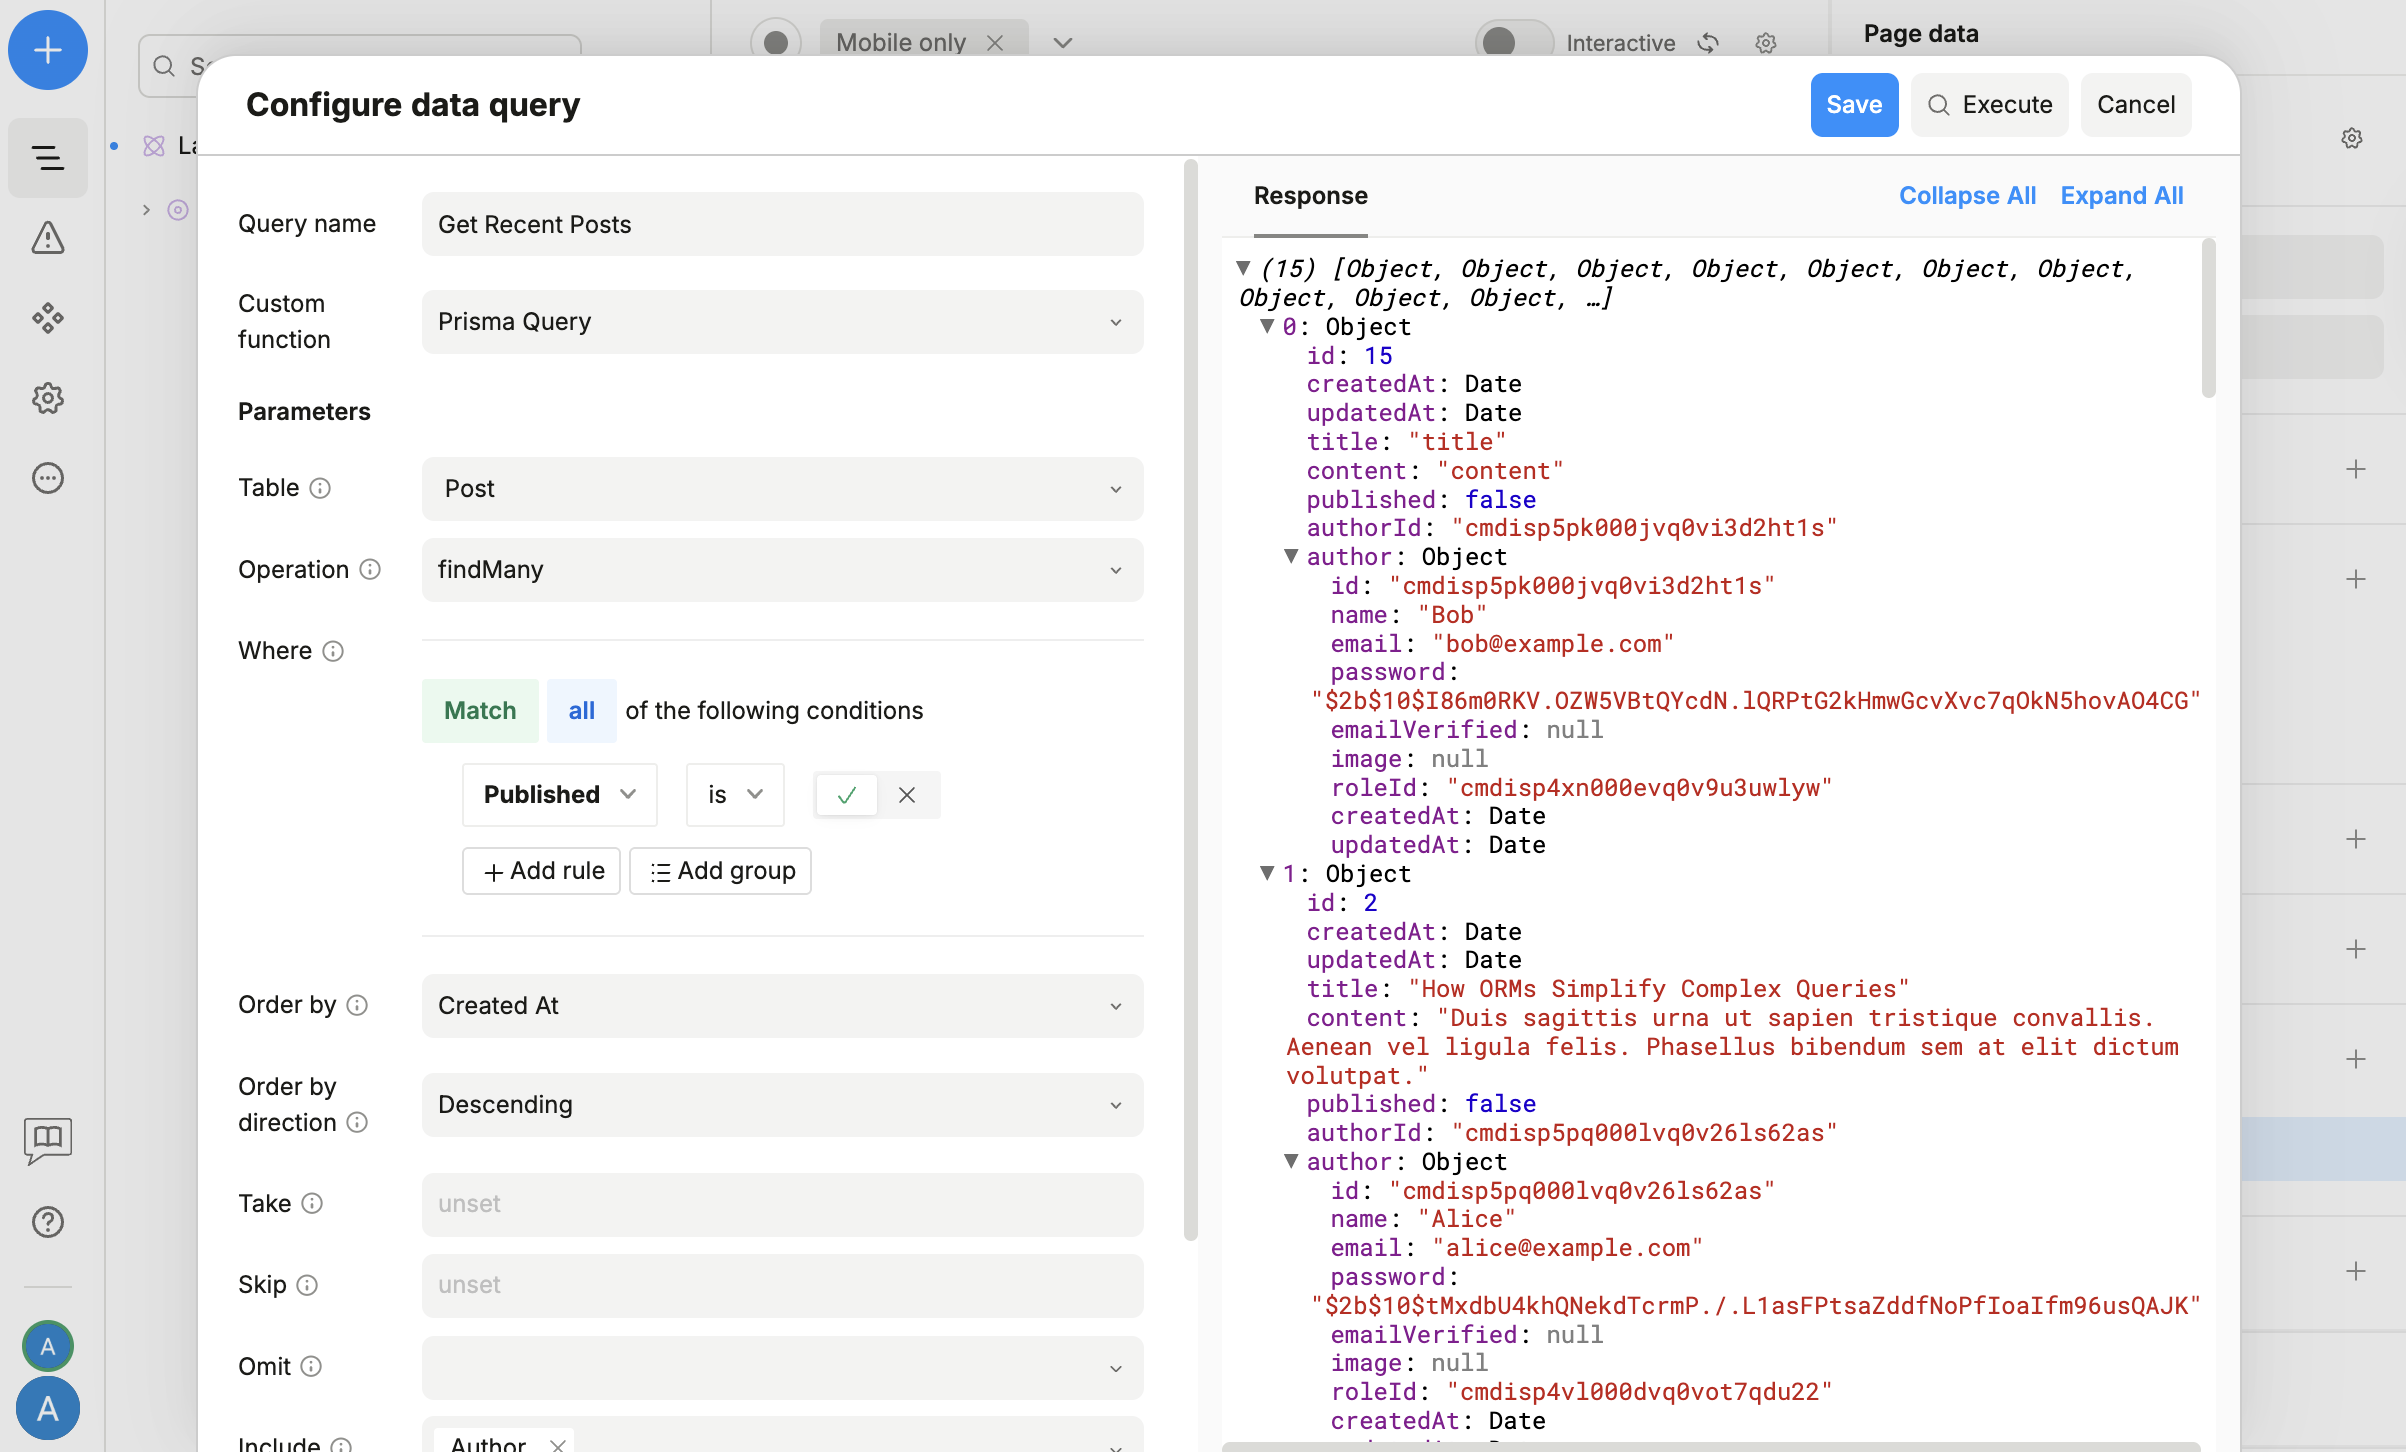
You should see an array under $q.getRecentPosts?.data. Bind a repeated container to that array, then bind the fields inside the repeated item to the current post’s title, content, and author.name.
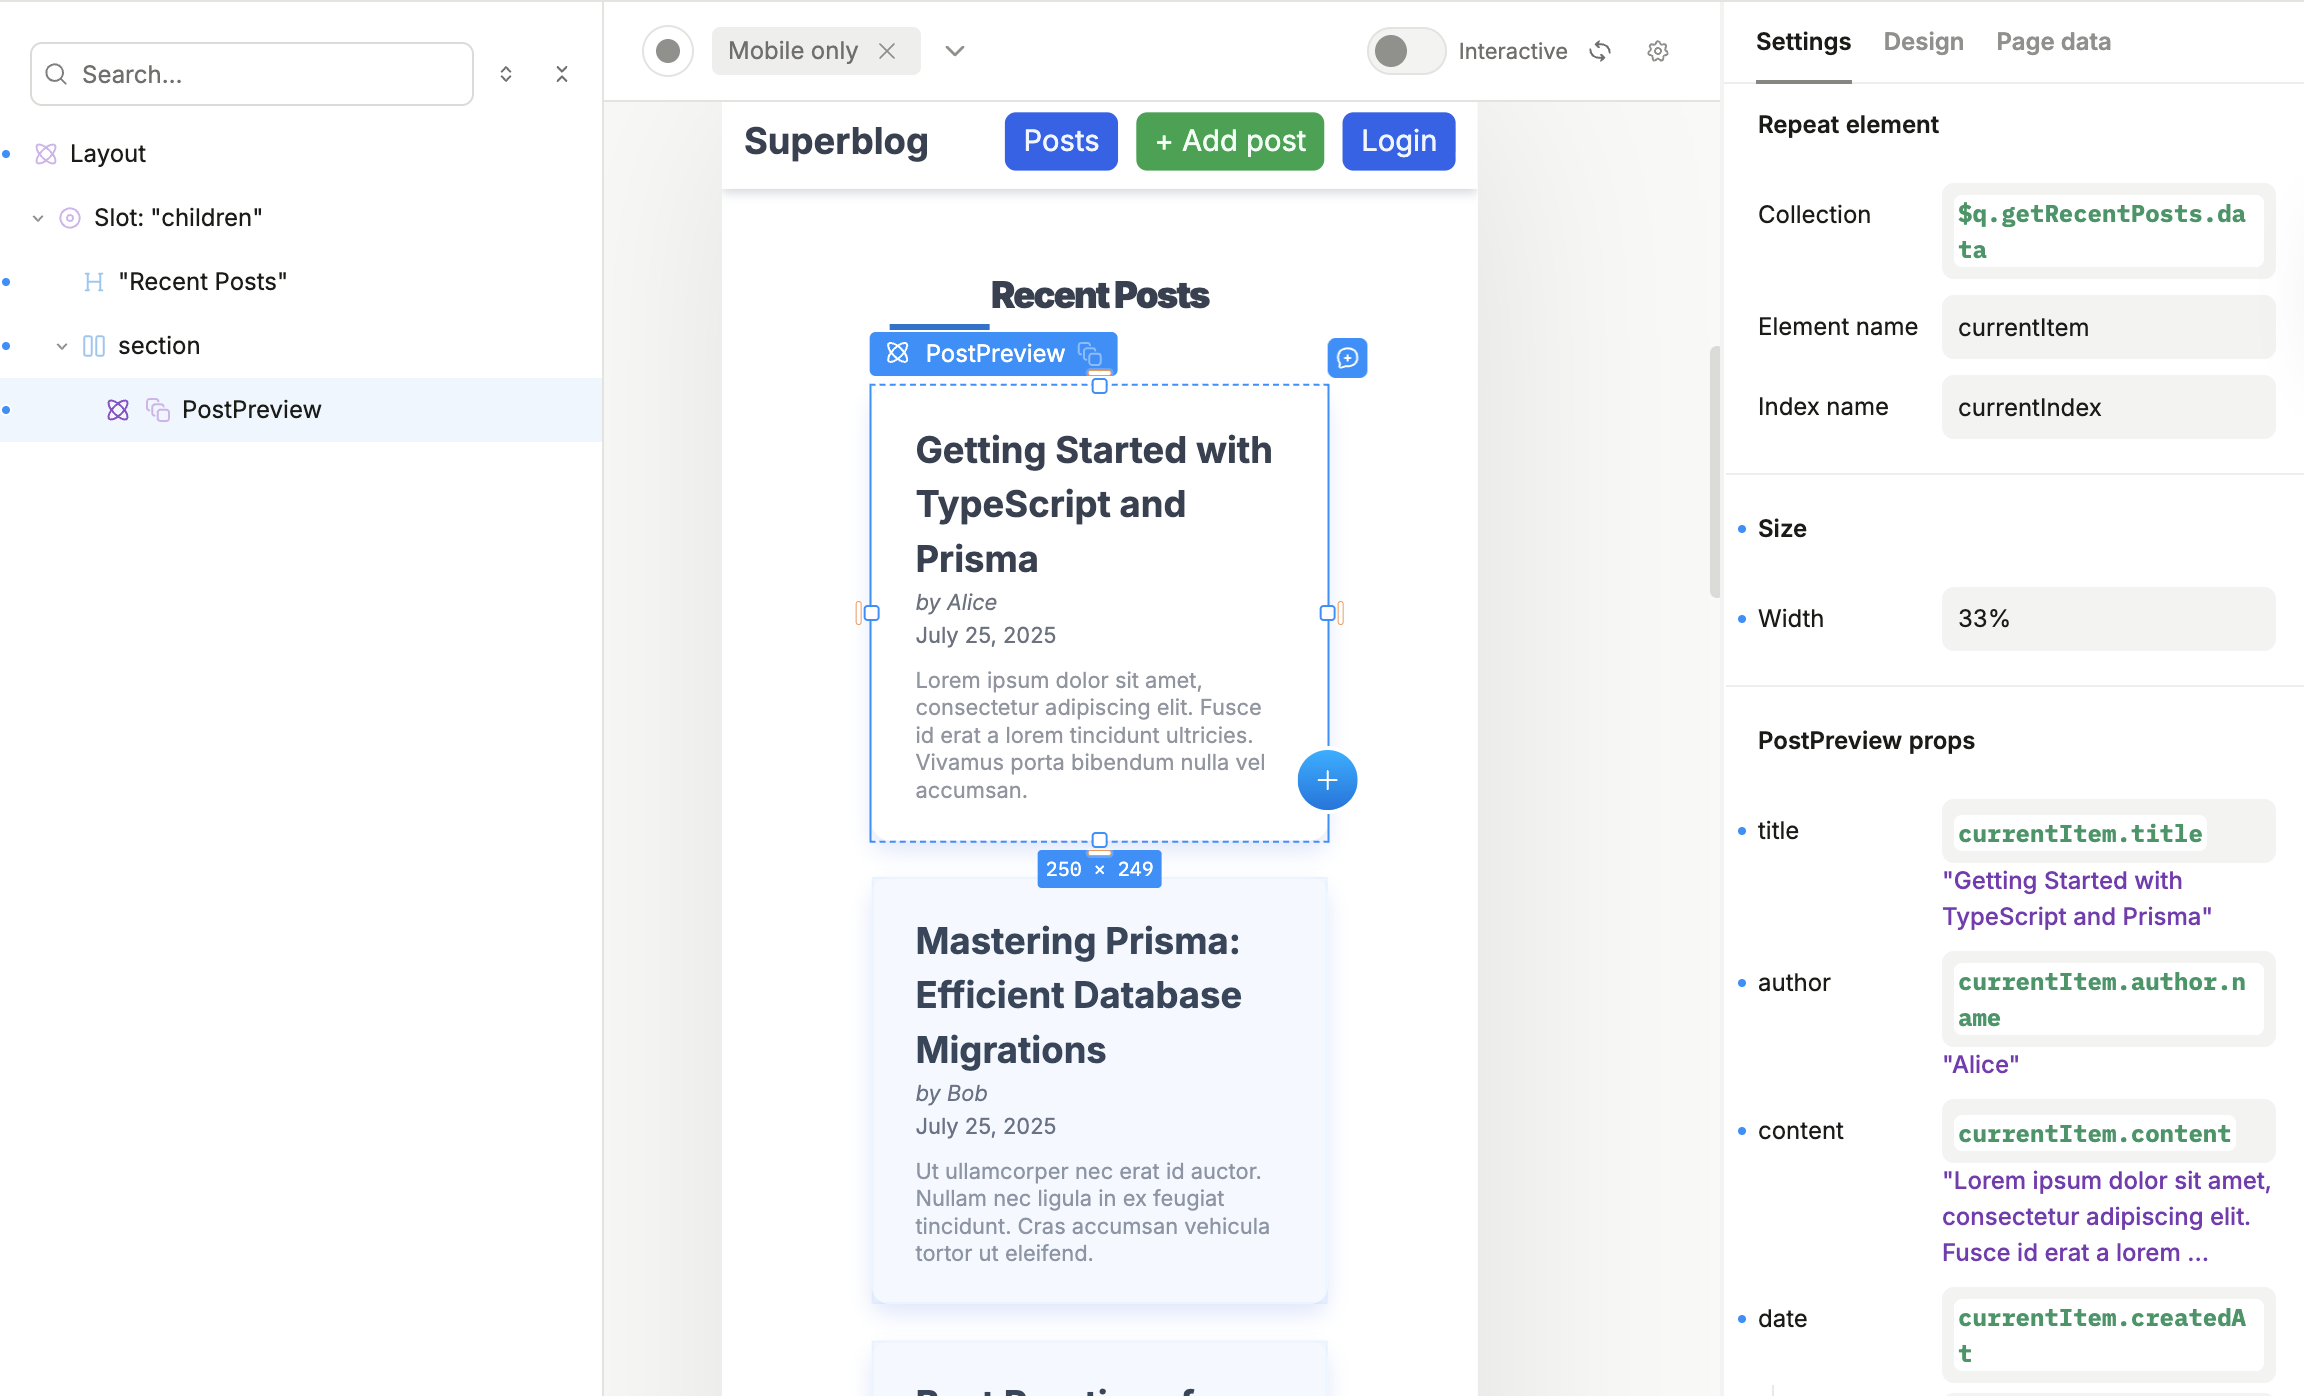
In short: records come from Prisma, page structure is configured in Plasmic, and the core fetching logic lives in code.
Use the same pattern for /posts/[id]
The repository already includes a route for this in app/posts/[id]/page.tsx. That file uses generateStaticParams() to fetch published posts from Prisma and prebuild their paths.
On the Plasmic side, create a page with the path /posts/[id]. Give id a preview value that exists in the database, such as 1 in a fresh seed. Then add a page query, for example Get Post, and filter Post by that same id parameter.
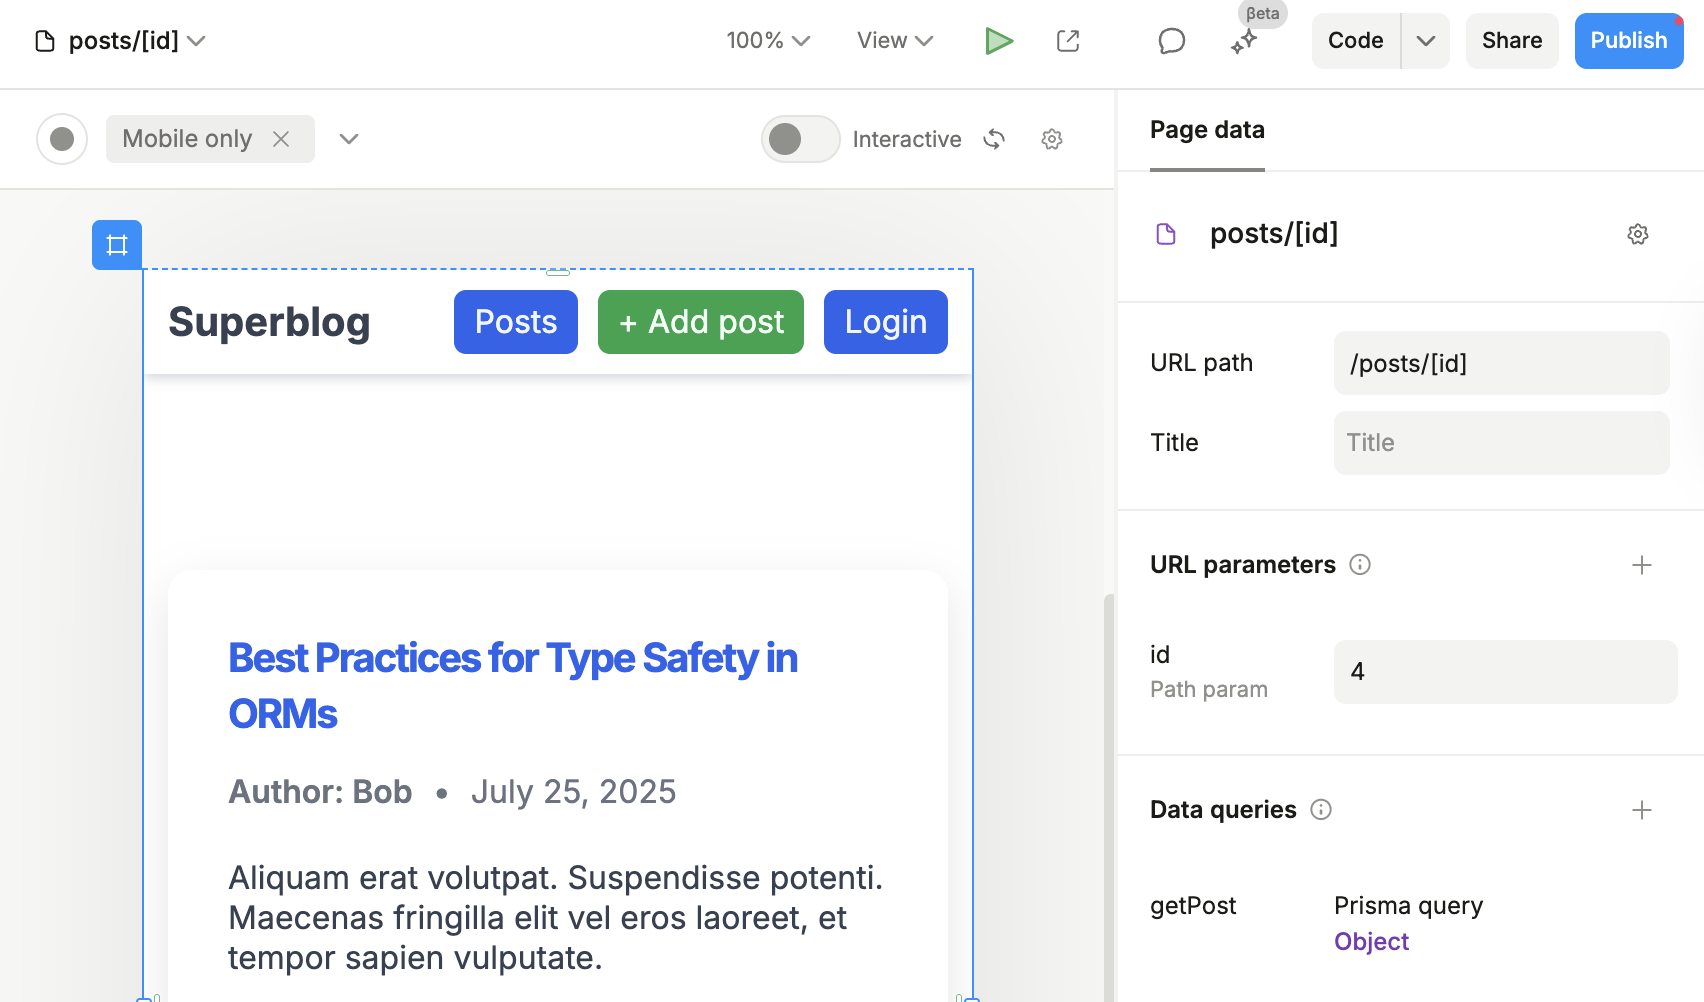
How this works at runtime:
- Next.js resolves the route.
- Plasmic receives the page param.
- The query uses that param to fetch one record.
- The page binds its fields to the result during SSR/SSG phase.
- The user sees the fully rendered page on first paint.
Configure dynamic metadata for posts
To make the posts more SEO-friendly, you can configure the page’s metadata to use the post’s title and content. In Plasmic Studio, go to the page settings and set the title and description fields to bind to $q.getPost?.data.title and $q.getPost?.data.content, respectively.
See this video for a quick walkthrough:
Using write operations
You can also use prismaQuery() in interactions for writing/updating/deleting items.
For example, let’s implement a functionality to create posts:
Create a simple form with two inputs and a button. The inputs will be for the post title and content, and the button will trigger the creation of a new post.
Add an interaction to a button that calls the
prismaQueryfunction with thecreateoperation on thePosttable.Bind the input fields to the values you want to create in the
datafield.
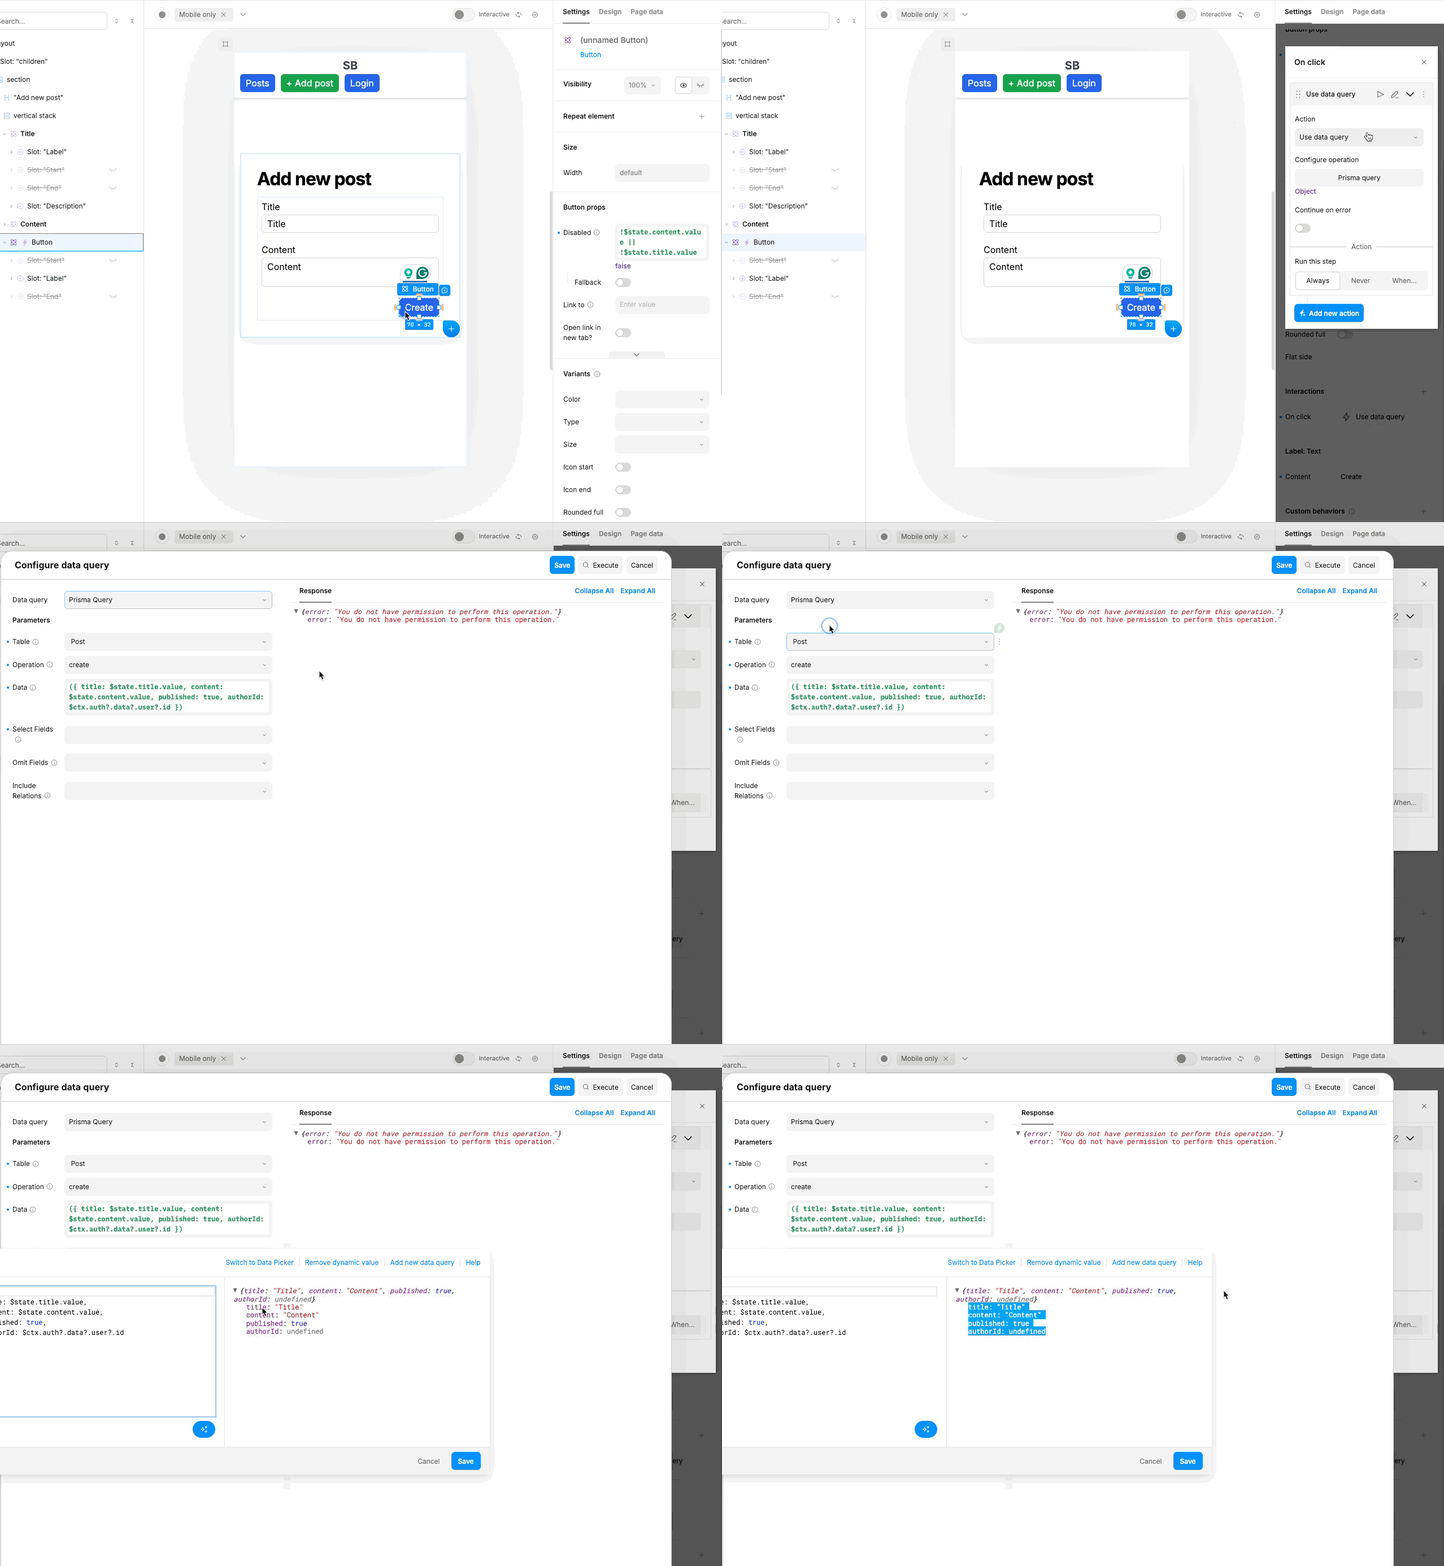
When the button will be clicked, the interaction will execute the query and create a new post in the database. You can then call Refresh Data action to see the new post appear.
How things work under the hood
Registering data queries and custom functions
The interesting part of this starter is that prismaQuery() is registered with enough metadata that Studio can present it as a query builder instead of a bare function call.
The function itself lives in functions/prismaQuery.tsx, and the Studio-facing registration lives in plasmic-init.ts:
PLASMIC.registerFunction(prismaQuery, {
  name: 'prismaQuery',
  isQuery: true,
  isMutation: true,
  params: [
    prismaTableParam,
    getPrismaOperationParam(PrismaOperations),
    // where, orderBy, pagination, select/include, cursor, distinct...
  ],
})
Here are a few important things to highlight about the registration:
isQuery: trueis what makesprismaQuery()appear in the Page Data panel as a custom data query.isMutation: trueis what makes it appear in the Interactions section as a data query.- Table names and field options come from an API route that reads Prisma Client’s runtime data model
- Things like
selectandincludeare automatically hidden because Prisma forbids using both together - Filtering, sorting, pagination, cursoring, and distinct selection are exposed as structured controls instead of a single free-form blob
Auth contexts
The starter registers a UserSession global context in plasmic-init-client.tsx. That gives Plasmic access to session data and to global login and logout actions.
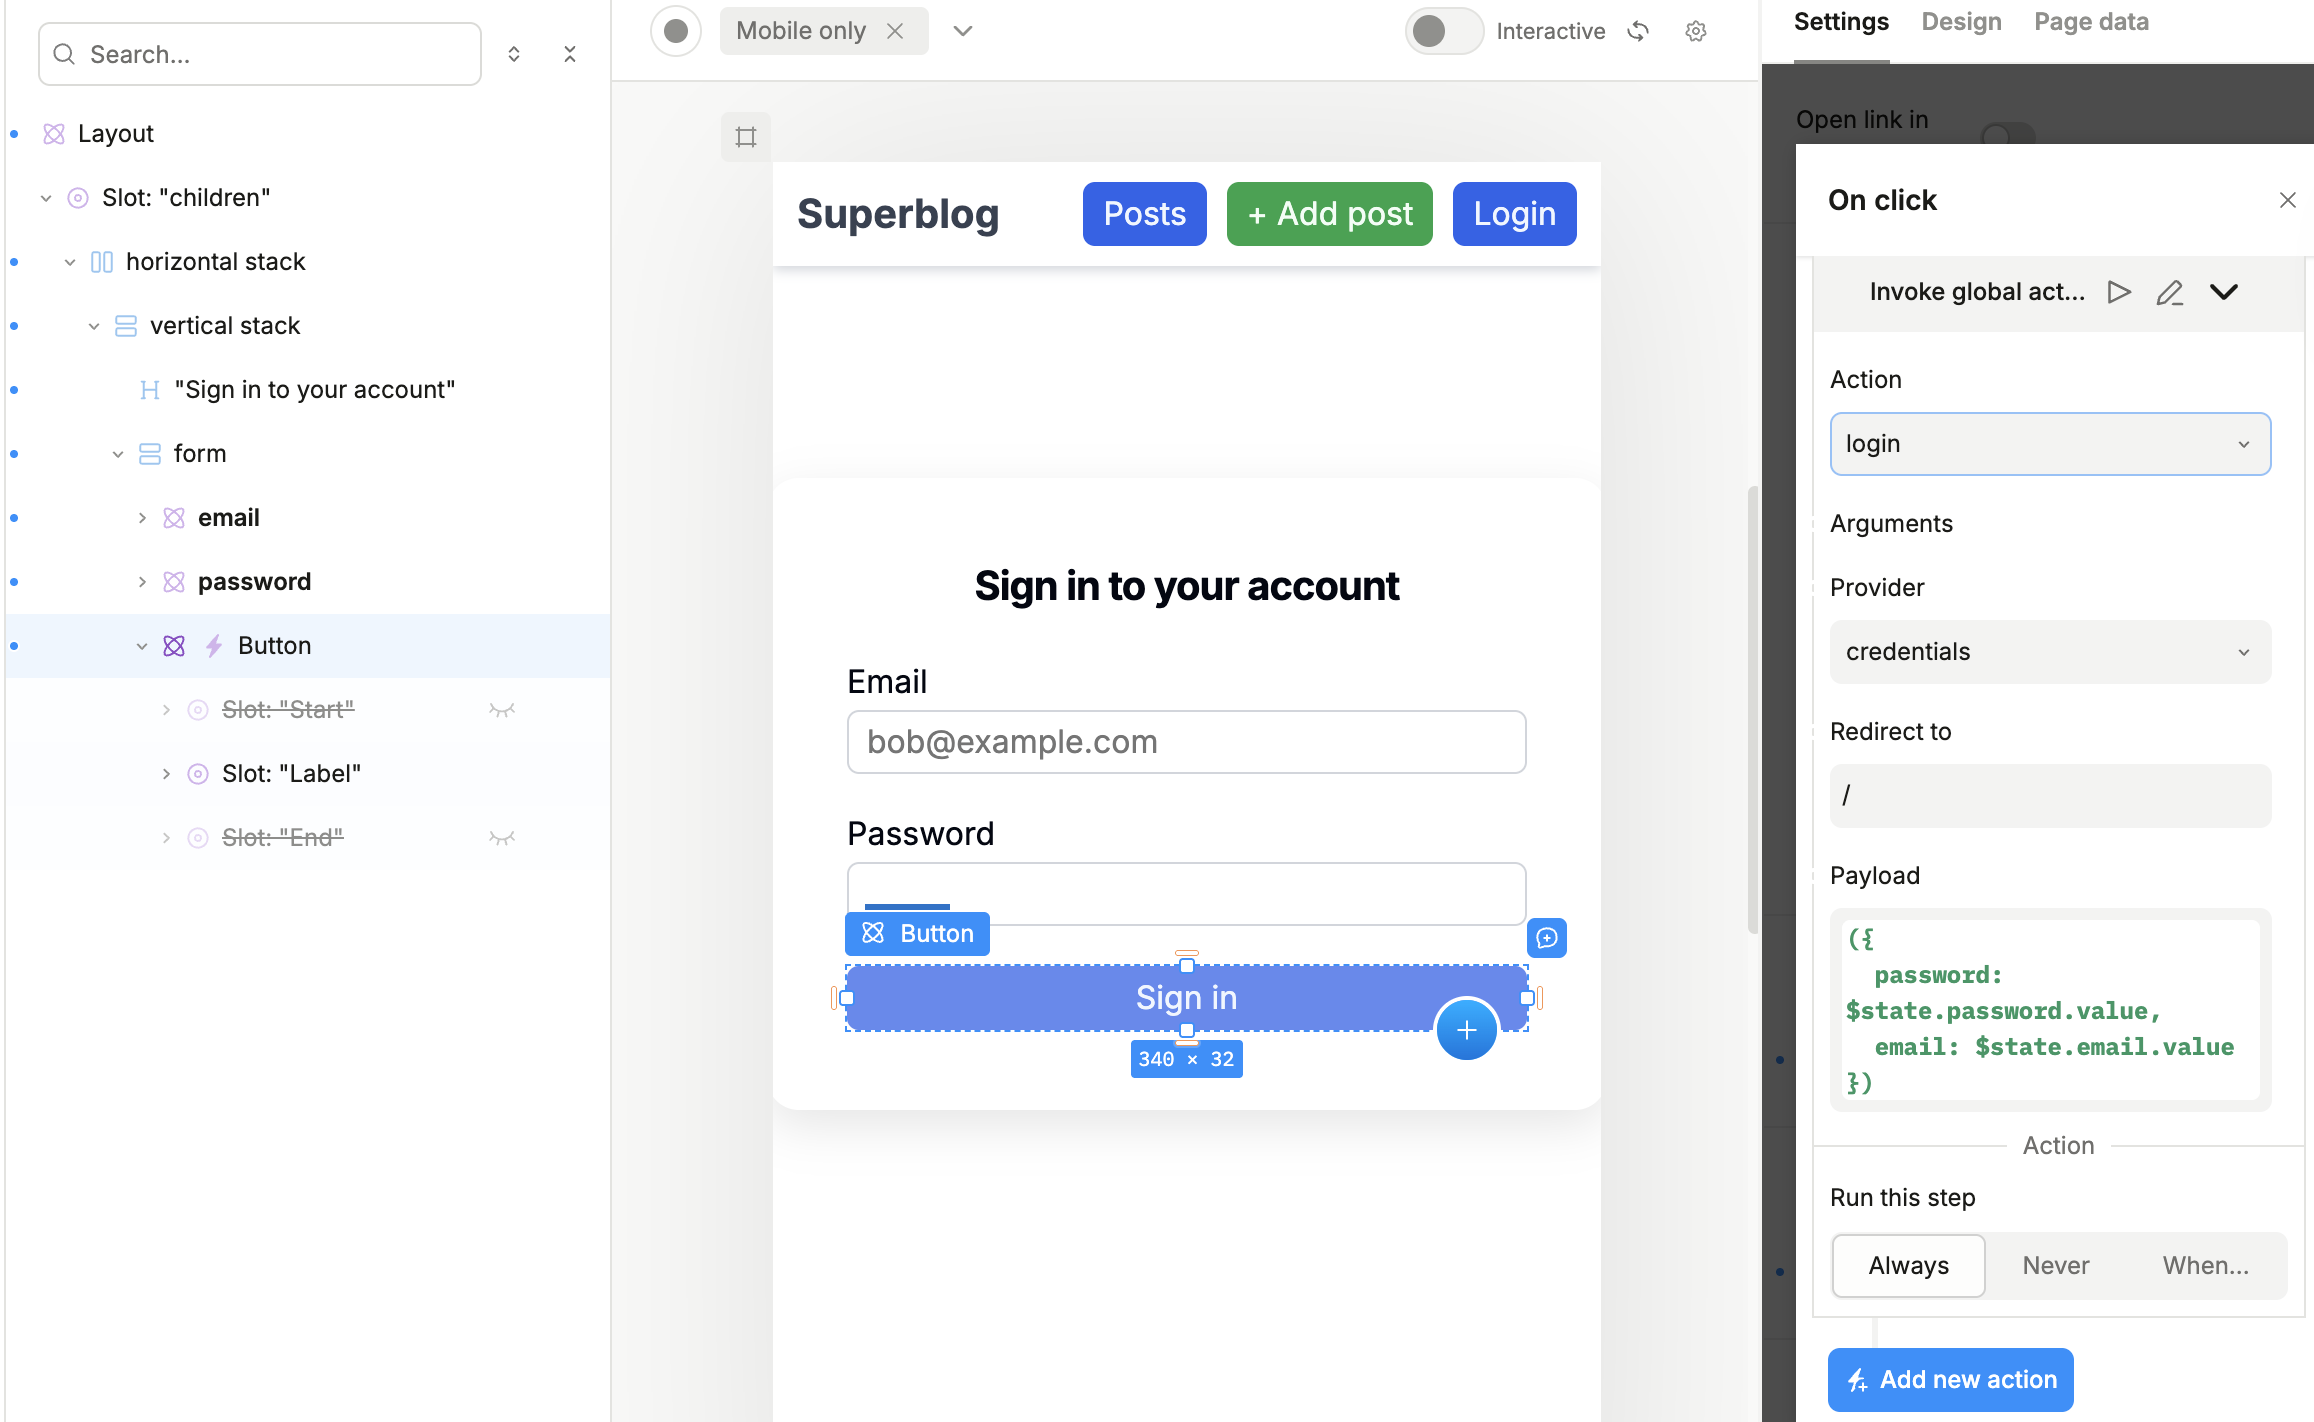
For local development, auth.config.ts loosens the cookie settings so app-host preview can work across tabs. That is why you can log into the local app in one tab and then see authenticated state inside Studio in another.
That is not meant for production — those cookie settings are turned off for security. Use localhost when you need to verify authenticated behavior inside Studio. Use the deployed host for normal shared editing.
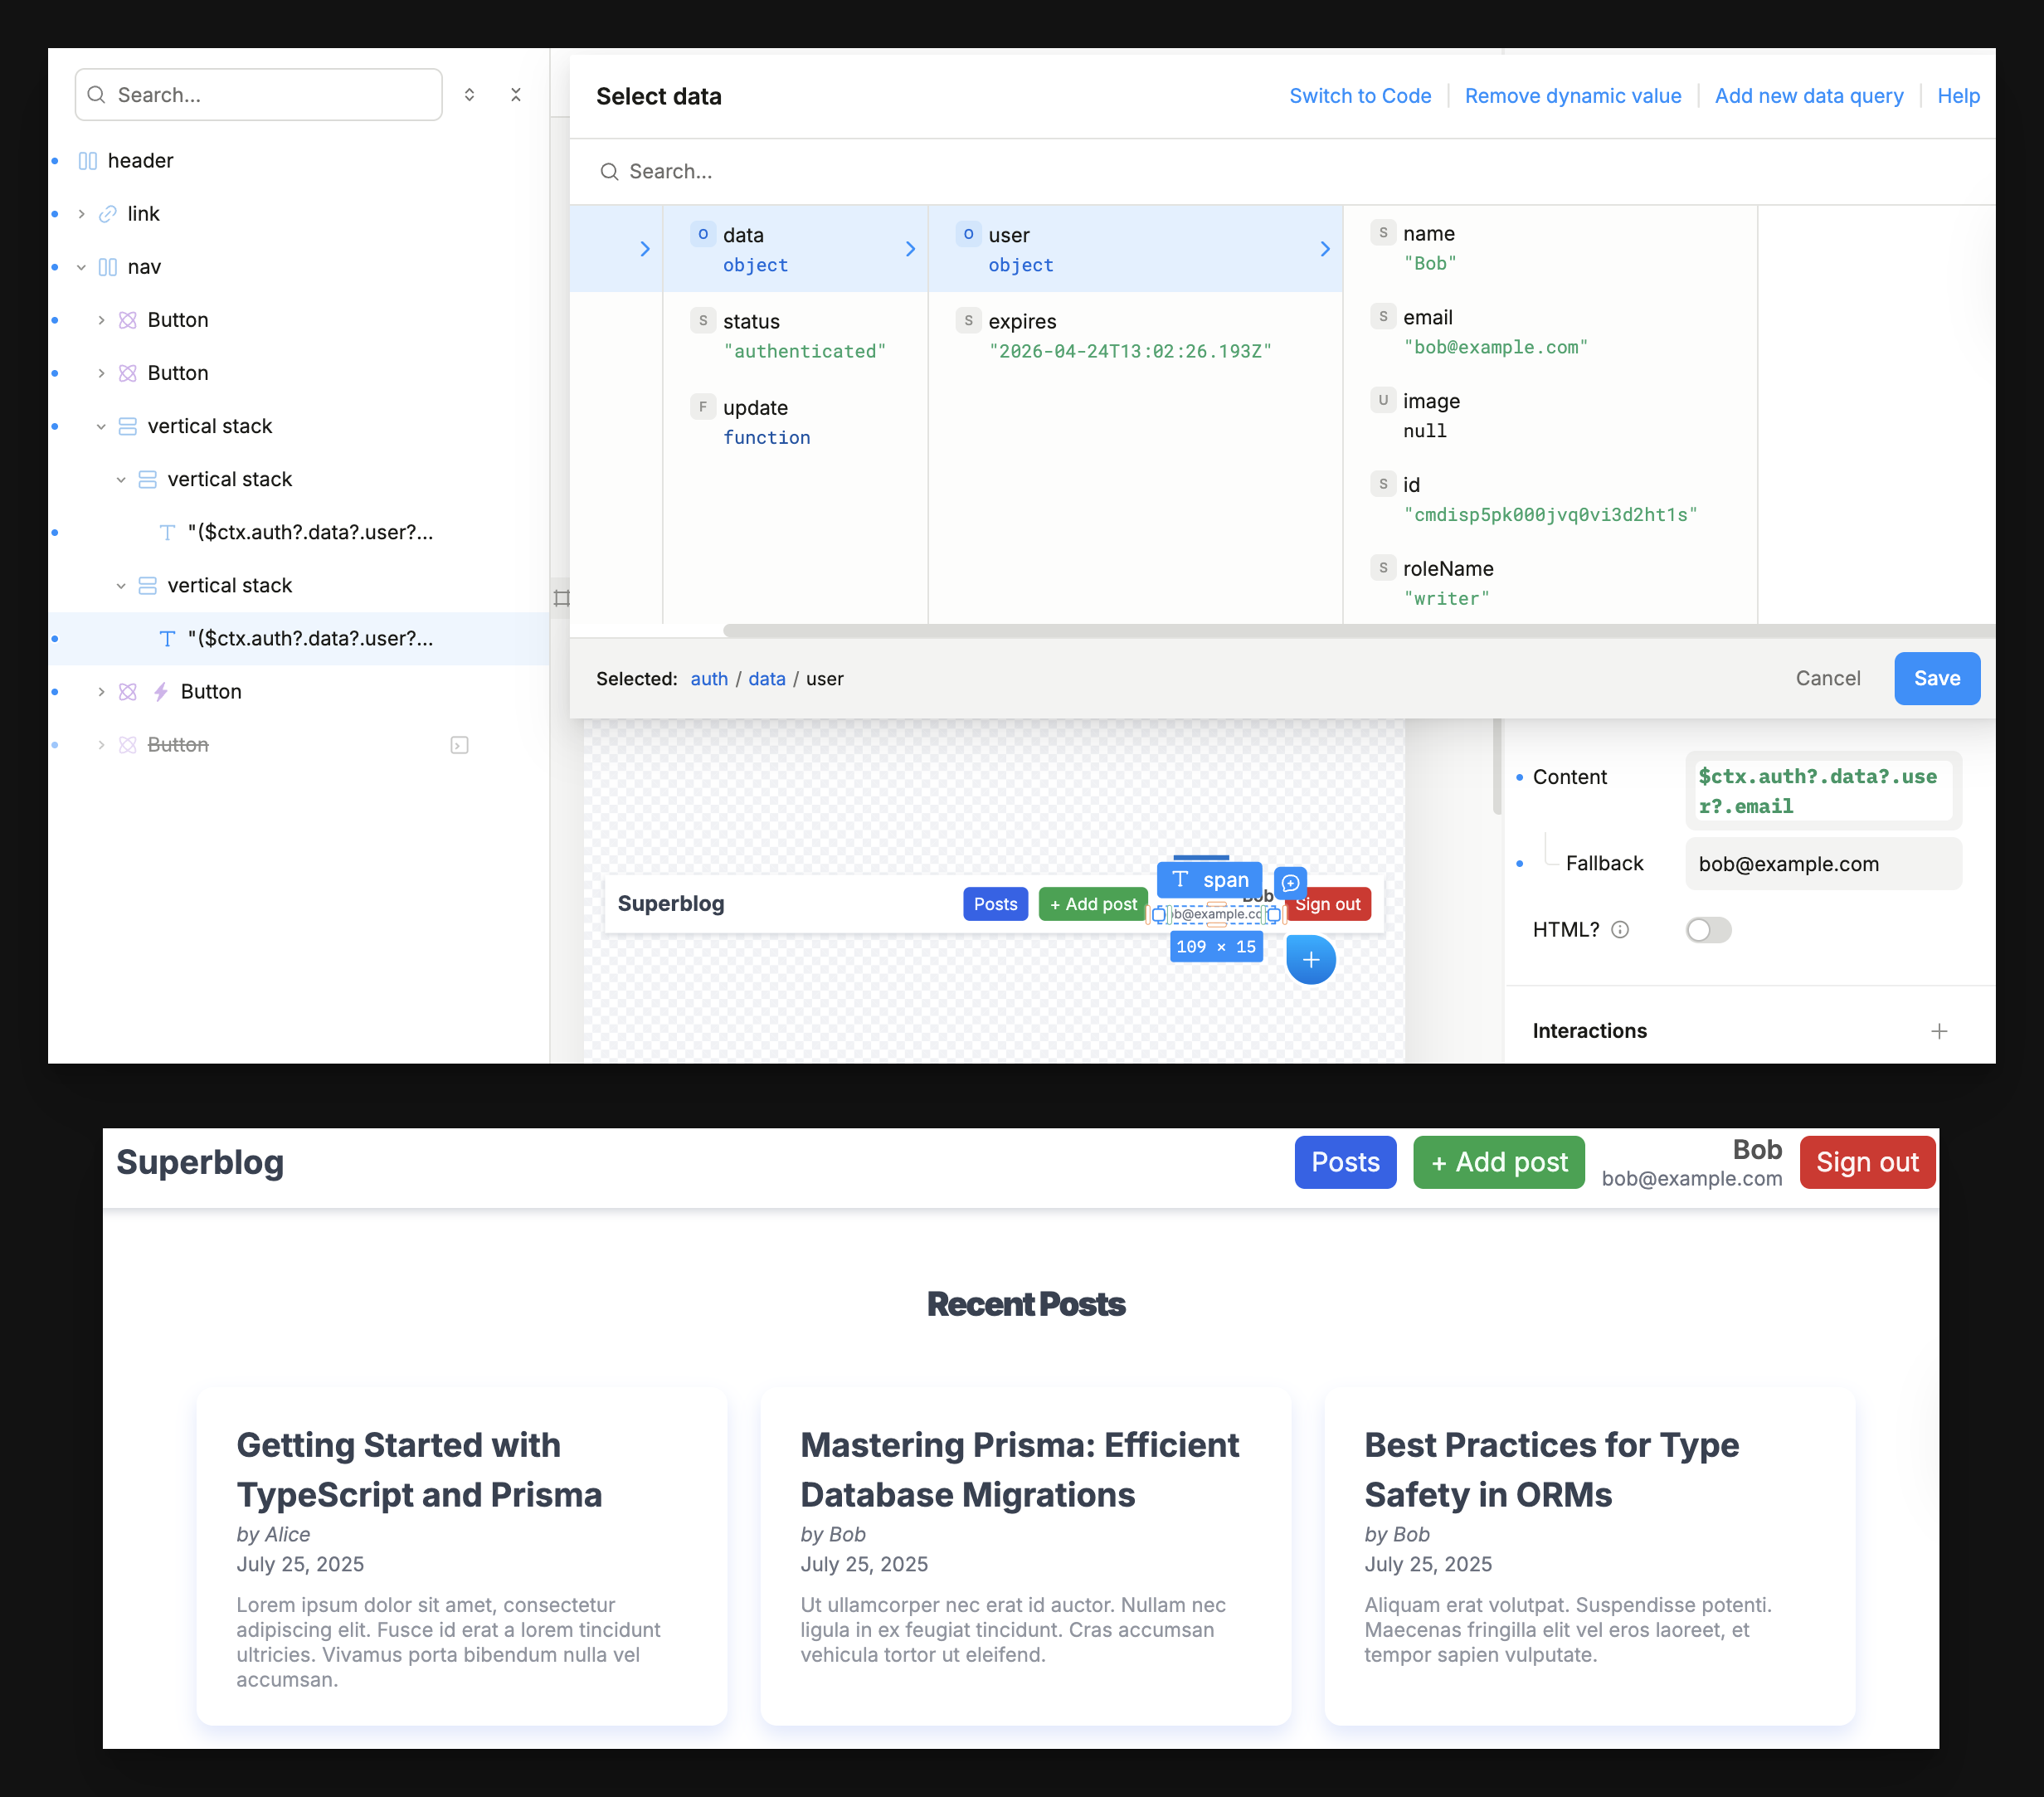
From here, the decisions are project-specific: which models users can access, how queries are configured and rendered, and which interactions belong in the code.
Permissions
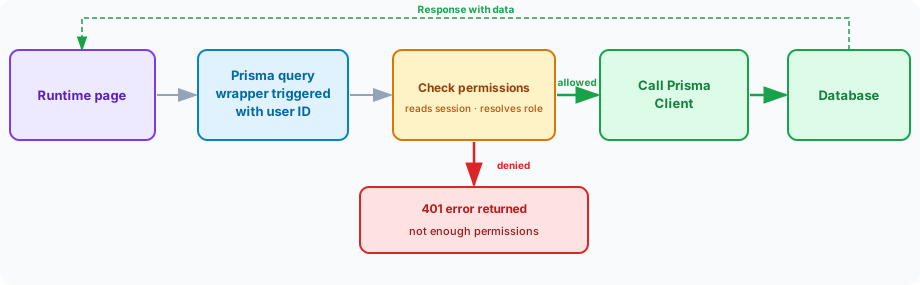
Before prismaQuery() executes a Prisma operation, it calls checkPermissions() on the server. That function reads the current Auth.js session, resolves the user’s role, and maps the requested Prisma operation to a CRUD permission.
So Plasmic can describe a query, but it cannot authorize it for safety reasons — auth should always be safely handled in code.
In the seeded roles:
- guests can read
- readers can read
- writers can read, create, update, and delete
You can create an admin UI to modify the permissions, or change it directly through Prisma. If the current user is not allowed to perform an operation, prismaQuery() returns an error and never reaches Prisma.
How to fetch data only on client-side
Unlike the data queries,
PrismaDataFetchercomponent is limited to read operations in this starter. If you know what you’re doing and you don’t want to call theprismaQuery()function directly, you can use the element actions pattern to call your API endpoints using interactions.
PrismaDataFetcher, registered in plasmic-init-client.tsx, wraps prismaQuery() and exposes a DataProvider with three values:
{
  data, error, loading
}
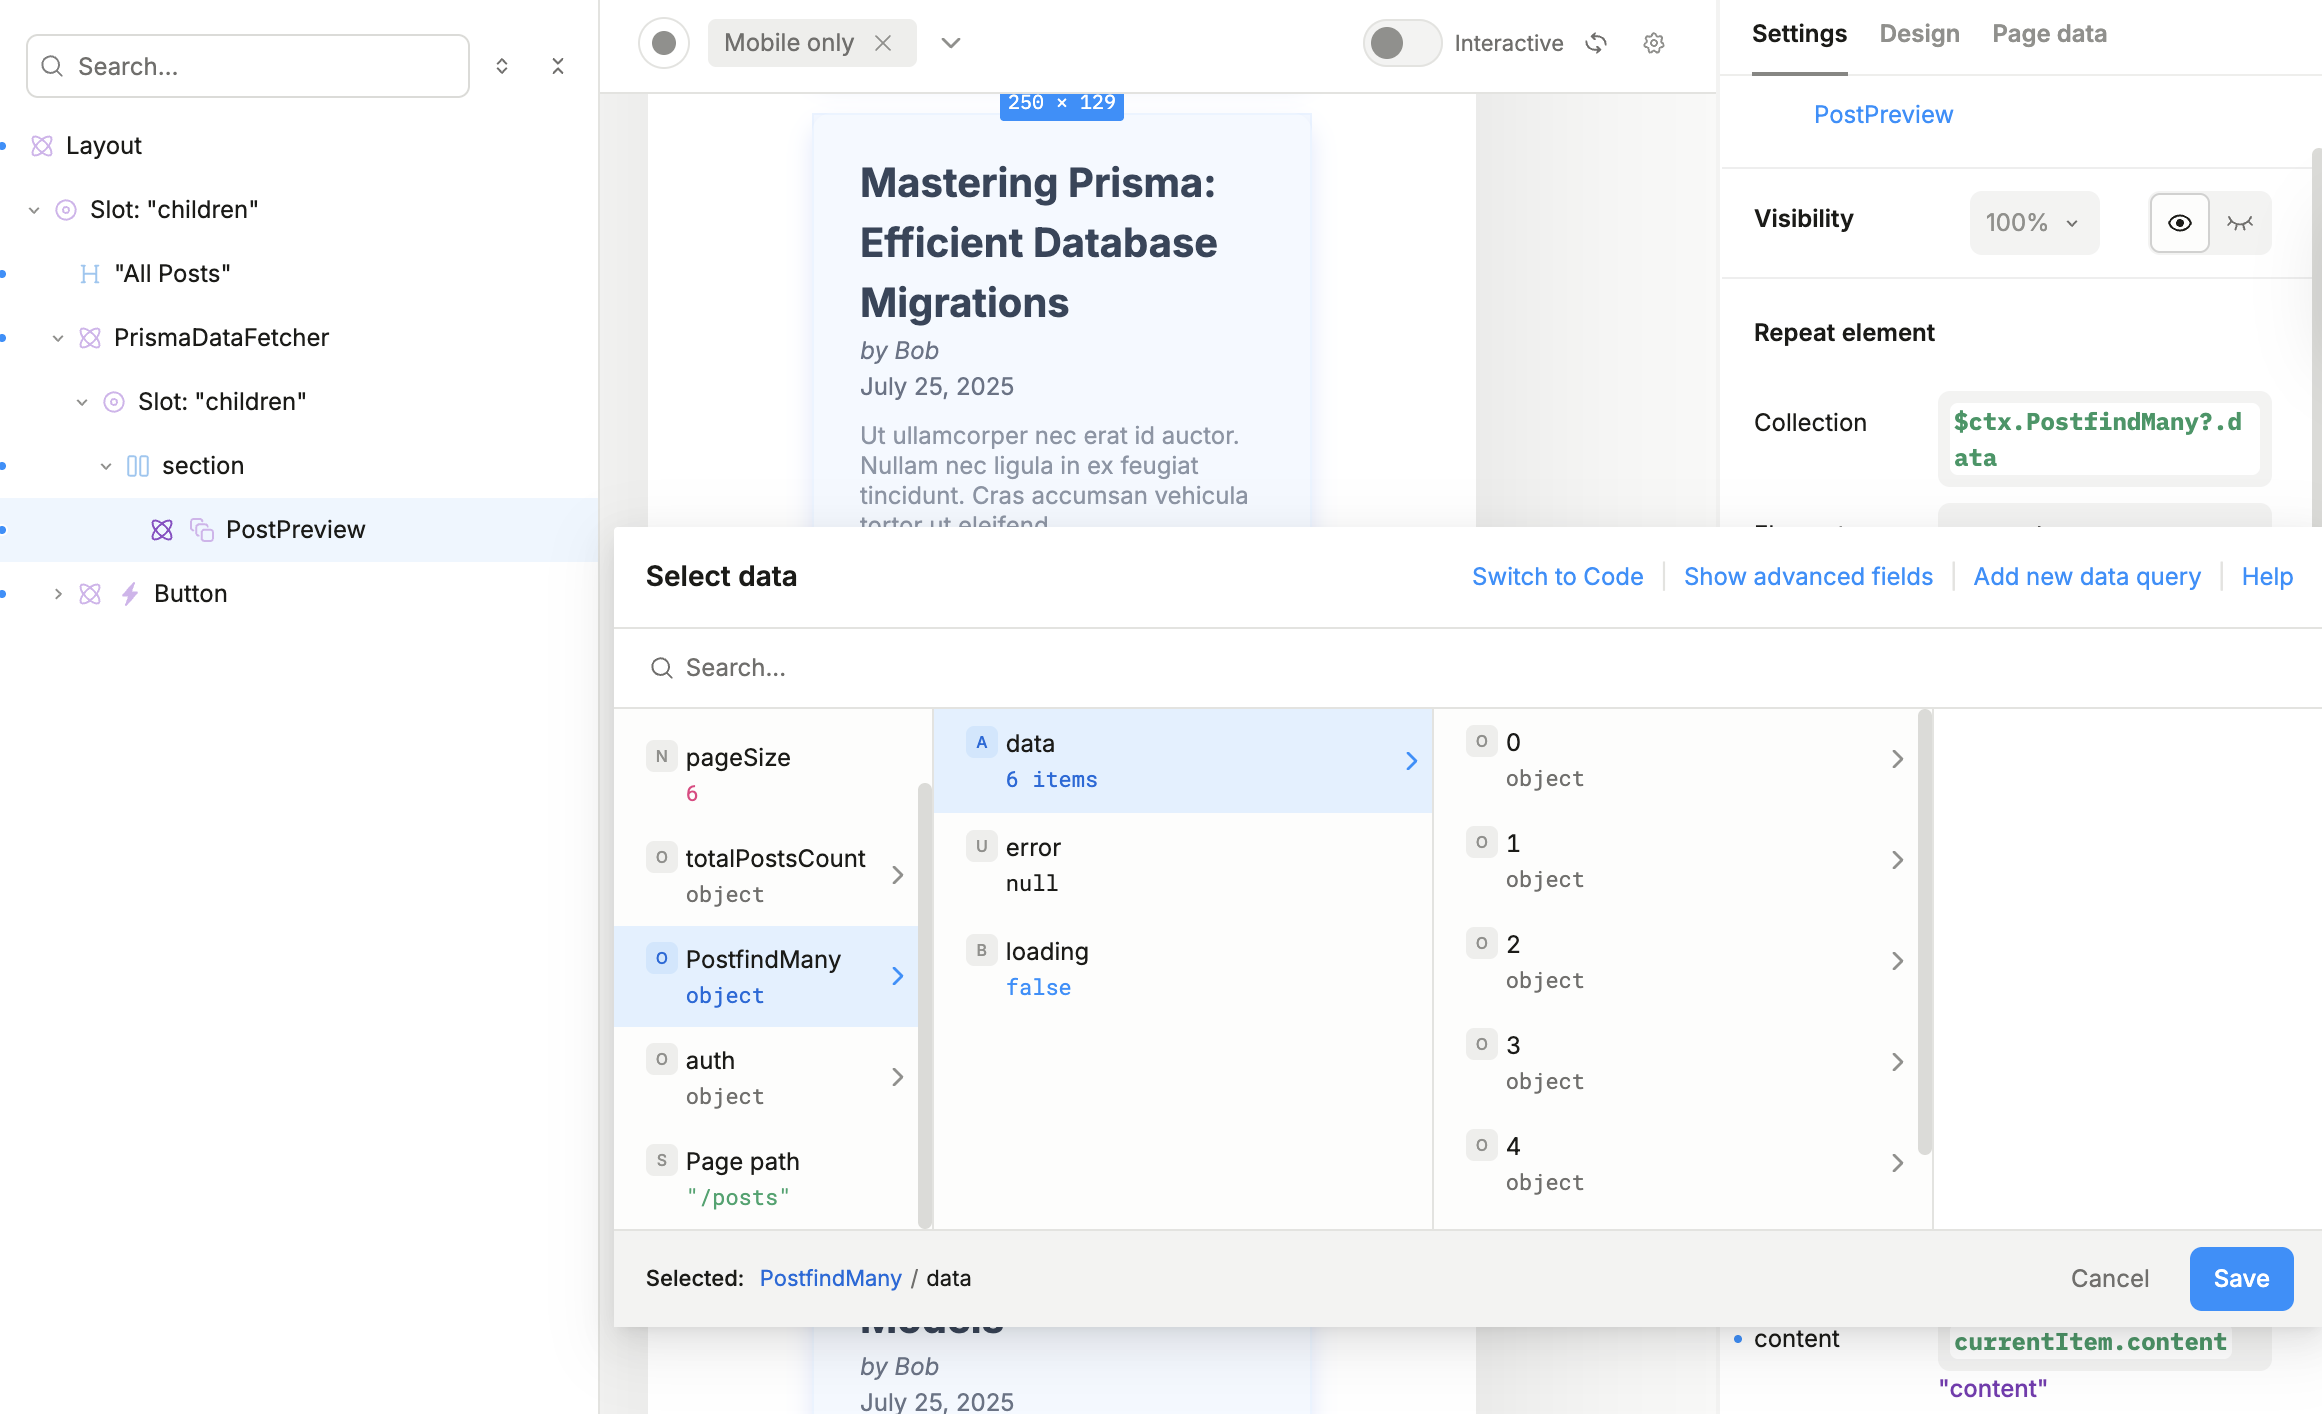
Usually you would want to use it for situation where SSR is not needed because data changes frequently and you always want to display the most up-to-date version. For example:
- A component that displays user subscriptions and needs to reflect changes immediately after the user adds or removes one.
- A dashboard that shows the current number of active users, and needs to update that number in real time.
- A feed of recent comments that should show new comments as they come in, without requiring a page refresh.
FAQ
pnpm build throws an error P3005
Error: P3005

The database schema is not empty. Read more about how to baseline an existing production database: https://pris.ly/d/migrate-baseline
In this case you need to define the baseline migration for your database once:
pnpm dlx prisma migrate resolve --applied 20250722115601_init
$q.MyQuery.data variable is undefined
When you are fetching the data sometimes the variable that should contain the data is undefined. This can be caused by a few different things:
- The query has not been executed yet. Make sure to execute the query in Plasmic Studio and check if there are any errors in the query configuration.
- The query is returning an error. Check the
errorproperty of the query result to see if there are any issues with the query execution. - The query is not returning any data. Check the database to ensure that there are records that match the query criteria.
- There is a mismatch between the query configuration and the database schema. Double-check the query parameters and ensure they align with your Prisma schema.
To prevent the fatal error we highly suggest to use optional chaining when accessing the data variable, like this:
$q.MyQuery?.data
Try it out!
If you haven’t already, try out the starter by clicking the Vercel button in the README.md or run the project locally. Then you can start building your own Plasmic + Prisma app on top of it!
Follow @plasmicapp on Twitter for the latest updates.